 Website:
Evident - Olympus Scientific Solutions
Grupo: EVIDENT
Excertos do catálogo

Your Vision, Our Future 3D Measuring Laser Microscope
Abrir o catálogo na página 1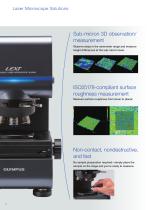
Laser Microscope Solutions Sub-micron 3D observation/ measurement Observe steps in the nanometer range and measure height differences at the sub-micron level. ISO25178-compliant surface roughness measurement Measure surface roughness from linear to planar. Non-contact, nondestructive, and fast No sample preparation required—simply place the sample on the stage and you're ready to measure.
Abrir o catálogo na página 2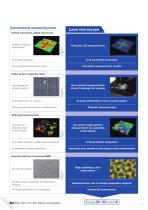
Conventional measuring tools Optical microscope, digital microscope Unable to measure small shapes Poor lateral resolution Non-traceable measurement results Laser microscope 0.12 μm lateral resolution Traceable measurement results Stylus surface roughness tester Can damage the sample’s surface Information from only one line Difficult to place the stylus on a target position Non-contact measurement doesn’t damage the sample Acquire information from an entire plane Pinpoint measurement White light interferometer Has difficulty capturing rough surface shapes Poor lateral resolution makes...
Abrir o catálogo na página 3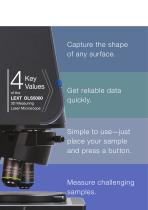
Capture the shape of any surface. LEXT OLS5000 3D Measuring Laser Microscope Get reliable data quickly. Simple to use—just place your sample and press a button. Measure challenging samples. 6
Abrir o catálogo na página 4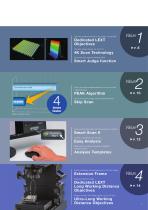
Uniform measurements in the entire visual field Dedicated LEXT Objectives Capture steep slopes up to 87.5° 4K Scan Technology Automatically acquire reliable data Smart Judge function 4 times faster Fast, accurate measurements from low to high magnifications PEAK Algorithm Save time during step shape measurements Skip Scan Value ► P. 10 Acquire accurate data with the press of a button Smart Scan II Create comprehensive reports Easy Analysis Reduce the variance between repeated measurements Analysis Templates Accommodates tall samples (up to 210 mm high) Extension Frame Measure dented...
Abrir o catálogo na página 5
Capture the shape of any surface The OLS5000 microscope’s advanced technology enables it to capture high-resolution measurements of 3D samples. Technology that delivers reliable data Uniform measurement values Dedicated LEXT objectives Long WD types (20x/50x/100x) Dedicated LEXT objectives With previous lens, aberrations made it difficult to accurately measure peripheral areas. Distortion increases at the periphery. Dedicated LEXT objective lenses can accurately measure peripheral areas. The periphery is reproduced free of distortion.
Abrir o catálogo na página 6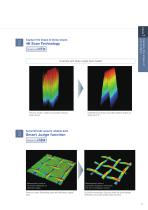
4K Scan Technology Details on P.17 A sample with steep angles (razor blade) Previous model: unable to accurately measure steep slopes. Capture the shape of steep slopes OLS5000 microscope: accurately detects slopes as steep as 87.5°. Automatically acquire reliable data Smart Judge function Details on P.18 Measurement noise is incorrectly displayed as repaired images. Previous model: Eliminating noise also eliminates original data. Measurement noise is accurately displayed, minimizing the risk of ambiguous results. OLS5000 microscope: Data and noise are automatically detected for accurate...
Abrir o catálogo na página 7
Get reliable data quickly The microscope’s scanning algorithm delivers improved data quality and improved speed to reduce scan time and streamline your workflow, resulting in improved productivity. Technologies that deliver speed Fast, accurate measurements PEAK Algorithm Details on P.17 Measurement time Measurement accuracy Hard to detect steps due to noisy data Conventional model Not possible at the same time times faster Both possible at the same time with OLS5000 High High Speed Accuracy BOTH Data acquisition time Close to the true value with only minor fluctuations VLSI standard 83nm...
Abrir o catálogo na página 8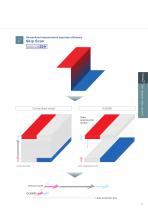
Streamlined measurement improves efficiency Skip Scan Details on P. 22 Value2 Get reliable data quickly Conventional model Skips scanning this section Scan every area Scan required area only Previous model Data acquisition time
Abrir o catálogo na página 9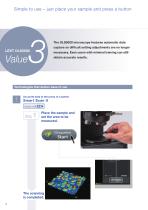
Simple to use – just place your sample and press a button The OLS5000 microscope features automatic data capture so difficult setting adjustments are no longer necessary. Even users with minimal training can still obtain accurate results. Technologies that deliver ease of use Accurate data at the press of a button Smart Scan II Details on P. 22 Place the sample and set the area to be measured.
Abrir o catálogo na página 10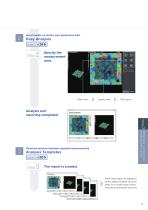
Good results no matter your experience level Easy Analysis Details on P. 24 Specify the measurement area. Select item Specify area Click report Analysis and reporting completed. Value 3 Simple to use – just place your sample and press a button Reduced variance between repeated measurements Analysis Templates Details on P.30 The report is created. When these steps are registered as the default template, all of the steps up to create report will be executed automatically next time.
Abrir o catálogo na página 11
Measure challenging samples The low-output, non-contact, nondestructive laser means no sample preparation is required. Delicate materials can be measured without being damaged. The extension frame accommodates samples with a height of up to 210 mm, while the ultra-long working distance objective facilitates measurement of concavities as deep as 25 mm. In both cases, all you have to do is place the sample on the stage. Technologies that deliver flexibility Compatible with samples up to 210 mm tall Extension Frame Details on P.31 Compatible with various samples Piston head
Abrir o catálogo na página 12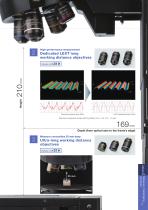
High-performance measurement Dedicated LEXT long working distance objectives Standard roughness sample 528 by Rubert & Co., Ltd. (Pt = 1.5 μm) Depth (from optical axis to the frame’s edge) Measure concavities 25 mm deep Ultra-long working distance objectives Details on P.31 Value 4 Measure challenging
Abrir o catálogo na página 13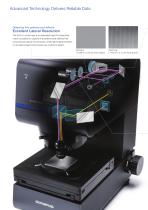
Advanced Technology Delivers Reliable Data Detecting fine patterns and defects Excellent Lateral Resolution The 405 nm violet laser and dedicated high-NA objectives make it possible to capture fine patterns and defects that conventional optical microscopes, white-light interferometers, or red laser-based microscopes are unable to detect. Red type ( 658 nm: 0.26 μm line & space) Violet type ( 405 nm: 0.12 μm line & space)
Abrir o catálogo na página 14Todos os catálogos e folhetos técnicos Evident - Olympus Scientific Solutions
-
39DL PLUS
12 Páginas
-
IPLEX GX/GT
8 Páginas
-
Industrial Light Source Range
4 Páginas
-
More Solutions, More Flexibility
20 Páginas
-
35 RDC
2 Páginas
-
Scanners and Accessories
36 Páginas
-
27MG Ultrasonic Thickness Gage
4 Páginas
-
Remote Visual Inspections
16 Páginas
-
OLYMPUS LC30
2 Páginas
-
TRIPLE KIT Generation 2
2 Páginas
-
CIX100
16 Páginas
-
OLYMPUS CIX Series
24 Páginas
-
MX63/MX63L
20 Páginas
-
SWTLU-C
4 Páginas
-
GX53
20 Páginas
-
DELTA Professional
2 Páginas
-
BTX II, TERRA
2 Páginas
-
MagnaFORM
2 Páginas
-
EX Series Instruments
4 Páginas
-
Vanta Overview
2 Páginas
-
Vanta Overview
3 Páginas
-
IPLEX TX Industrial Videoscopes
4 Páginas
-
Clear Images, Precise Analysis
8 Páginas
-
Portable XRD
2 Páginas
-
TOFD Solution
4 Páginas
-
BondMaster 600
5 Páginas
-
Triple Kit Generation 2
2 Páginas
-
45MG
12 Páginas


