
- Catalogs
- WING ARMOR
- De-icer Manual

De-icer Manual

De-icer Manual
- Owners' Responsibilities: Ensure only trained personnel operate the equipment and understand controls and repair procedures.
- Operators' Responsibilities: Inspect equipment before use, keep unauthorized persons away, and follow safety instructions.
- General Safety Guidelines: Wear PPE, operate in well-ventilated areas, and do not modify equipment.
- Pre-Operation Checklist: Inspect the unit, secure it, and prepare for cold weather operation if necessary.
- Pre-Startup Procedure: Check fluid levels and ensure all components are ready for operation.
- Startup Procedure: Turn on power, start the engine, and activate the burner.
- Shutdown Procedure: Turn off the burner, reduce engine speed, and purge the system.
- Fuel Solenoid Valve: Clean, repair, or replace if not opening.
- Weak Transformer: Clean and check terminals.
- Plugged Oil Nozzle: Replace the nozzle; do not clean.
- Faulty Burner Oil Pump: Adjust or replace.
- Unit Smokes: Use No. 1 or No. 2 fuel oil, adjust air intake, and remove soot from coils.
- Deice Fluid Temperature Too Low: Adjust thermostat, descale coils, and readjust burner.
- Unit Weight: 1,400 lbs (635 kg) empty
- Battery: Type U1, 12V DC
- Water Flow & Pressure: 4 GPM @ 3,500 PSI (15.1 LPM @ 24,000 kPa)
- Engine: 13 HP Honda, electric start, gasoline-powered
- Burner: 350,000 BTU oil-fired burner, 12-volt operation
- Fuel Tank: 10-gallon capacity (37 L)
- Lance: 36” gun & wand assembly, 4 wash nozzles
- Type: Air-cooled 4-stroke OHV
- Displacement: 389 cm3
- Net Power Output: 11.7 HP (8.7 kW) @ 3,600 rpm
- Fuel: Unleaded 86 octane or higher
- Immediate notification of defects is required for warranty claims.
- Wing Armor will repair or replace defective components free of charge, excluding pumps.
- Warranty does not cover damages from improper maintenance, repairs, or use of non-original parts.
- The warranty period is 12 months from the delivery date.
- Warranty requests must be submitted within 30 days of repair.
Catalog excerpts

AIRCRAFT DE-ICER SAFER. FASTER. SMARTER. Wing Armor the best portable de-icer.
Open the catalog to page 1
DISCLAIME R Wing Armor provides this publication "as is" without warranty of any kind, either expressed or implied. While every precaution has been taken in the preparation of this manual, Wing Armor assumes no responsibility for errors or omissions. Neither is any liability assumed for damages resulting from the use of the information contained herein. Wing Armor reserves the right to revise and improve its products as it sees fit. This publication describes the state of this product at the time of its publication, and may not reflect the product in the future. All trademarks and registered...
Open the catalog to page 2
AIRCRAFT DE-ICER MANUAL UNDE RS TA NDING T HE M A NU A L Read, understand and follow all guidelines and safety information in this manual. Unauthorized persons should not operate equipment. Death or damage to humans, property and other can result. This product has been designed and fabricated to deliver efficient and reliable service provided it is operated safely and maintained in accordance with the instructions in this manual. This product should be used for its intended purpose only. This manual is provided as a guideline to the owner(s) and operator(s) for the operation and maintenance of...
Open the catalog to page 3
AIRCRAFT DE-ICER MANUAL O W NE RS ’ RE SP ONSIBIL I T IE S Owners must ensure that only trained and qualified personnel operate the equipment. Owners must be confident that operators and maintenance personnel have a clear knowledge of the operating controls and the repair of all equipment. OP E R AT ORS ’ RE SP ONSIBIL I T IE S Operators must ensure that all equipment is in safe working order! Equipment must not be operated if not in proper working order! *Keep unauthorized persons away from the equipment area during operation. Having safety personnel present is essential during all operations...
Open the catalog to page 4
Before storing your De-Icer, certain precautions should be taken to protect it from deterioration. 1. Clean the De-Icer thoroughly. 2. Make all necessary repairs. 3. Replace any missing or damaged decals. 4. Check oil levels in engine, pump and gearbox. 5. Store on a level surface in a dry environment. • Store in a shaded area to minimize plastic and rubber weathering. • Ensure all external elements are in proper condition. • Address any issues such as fluid leaks, dents, or other damage before starting the unit. • Use wheel chocks, wheel locks or attach the draw bar to a tow vehicle with its...
Open the catalog to page 5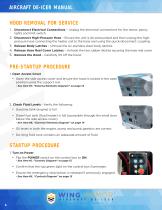
1. Disconnect Electrical Connections - Unplug the electrical connections for the dome, penny lights and limit switch. 2. Disconnect High-Pressure Hose - Ensure the unit is de-pressurized and then unplug the high-pressure hose connecting the heater coil to the hose reel using the quick-disconnect coupling. 3. Release Body Latches - Unhook the six stainless steel body latches. 4. Release Hose Reel Cover Latches - Unhook the two rubber latches securing the hose reel cover. 5. Remove the Hood - Carefully lift off the hood. 1. Open Access Cover • Open the side access cover and ensure the hood is locked...
Open the catalog to page 6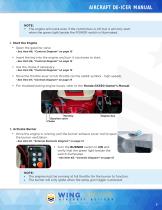
• The engine will crank even if the control box is off, but it will only start when the green light beside the POWER switch is illuminated. • Open the gasoline valve. - See Item #8, “Controls Diagram” on page 15 • Insert the key into the engine and turn it clockwise to start. - See Item #6, “Controls Diagram” on page 15 - See Item #9, “Controls Diagram” on page 15 • Move the throttle lever to full throttle (to the rabbit symbol - high speed). - See Item #7, “Controls Diagram” on page 15 • For troubleshooting engine issues, refer to the Honda GX390 Owner’s Manual. 3. Activate Burner • Once the...
Open the catalog to page 7
AIRCRAFT DE-ICER MANUAL 4. Activate Lights (Optional) • Turn the LIGHTS switch on the control box to illuminate the flashing orange dome light and corner marker lights. - See Item #4, “Controls Diagram” on page 15 SHU T DO W N P ROCE DURE 1. Turn Off Burner • Flip the BURNER switch to OFF. - See Item #2, “Controls Diagram” on page 15 2. Reduce Engine Speed • Move the throttle lever to low throttle (to the turtle symbol - low speed). - See Item #7, “Controls Diagram” on page 15 • Turn the engine key counter-clockwise to the OFF position. - See Item #6, “Controls Diagram” on page 15 • Flip the...
Open the catalog to page 8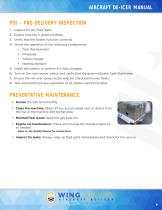
1. Inspect for any fluid leaks. 2. Ensure tires are in good condition. 3. Verify that the brakes function correctly. 4. Check the operation of the following components: • Tank thermometer • Fill gauge • Trickle charger • Heating element 5. Install the battery or confirm it is fully charged. 6. Turn on the main power switch and verify that the green indicator light illuminates. 7. Ensure the roll-over spray nozzle selector check ball moves freely. 8. Test and confirm proper operation of all marker and dome lights. • Clean the machine: Wipe off any accumulated soot or debris from the top of the...
Open the catalog to page 9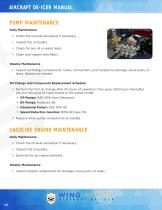
Daily Maintenance • Check the oil level and adjust if necessary. • Check for any oil or water leaks. • Clean and inspect inlet filters. • Inspect all fittings, components, hoses, connections, and nozzles for damage, loose parts, or leaks. Replace as needed. • Perform the first oil change after 50 hours of operation, then every 500 hours thereafter. Use the following oil types based on the pump model: • Speed Reduction Gearbox: 80W-90 Gear Oil • Replace other pump components as needed. • Check the oil level and adjust if necessary. • Examine the air cleaner element. • Inspect engine components...
Open the catalog to page 10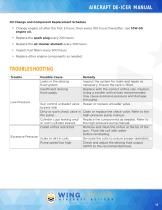
Oil Change and Component Replacement Schedule • Change engine oil after the first 5 hours, then every 100 hours thereafter. Use 10W-30 engine oil. • Replace the spark plug every 100 hours. • Replace the air cleaner element every 100 hours. • Inspect fuel filters every 300 hours. • Replace other engine components as needed.
Open the catalog to page 11