- Catalogs
- SupAir-VLD
- PIXAIR 2
PIXAIR 2

PIXAIR 2
The PIXAIR 2 harness is designed for paragliding enthusiasts, emphasizing comfort and ease of learning. It complies with European and German safety standards (EN 1651 and LTF 91/09). A hang-test is recommended for adjustment before the first flight.
Available in sizes S, M, and L, the harness accommodates pilots from 155 cm to 195 cm in height and 60 kg to 100 kg in weight. It features an airbag impact damping system and is suitable for paragliding, but not for acrobatic flying. It can be used for towing.
A height/weight table assists in selecting the appropriate size. A preliminary hang-test ensures a proper fit.
The manual lists components and options for the PIXAIR 2, including reserve parachute handles, seat plates, and carabiners.
Features include leg strap buckles, chest strap adjustments, shoulder strap adjustments, and a reserve parachute pocket. Storage pockets for radios and hydration tubes are also included.
Instructions for assembling accessories like the seat plate, carabiners, speed-bar, and foot-rest are provided, with specific installation steps for functionality.
Detailed steps for installing the reserve parachute are provided, emphasizing professional installation and regular extraction tests.
Proper adjustment of the harness is crucial for safety and comfort, with guidelines for adjusting the chest strap, shoulder straps, backrest, and leg straps.
Guidelines for cleaning, maintenance, storage, and transport ensure the harness's longevity. It also covers repairs, spare parts, and recycling.
Warranty information and a disclaimer regarding the harness's use are included.
The PIXAIR 2 harness offers safety, comfort, and ease of use. Proper installation, adjustment, and maintenance are essential for optimal performance.
The harness features pre-inflated dorsal protection via the AirBag 4Box system, self-locking carabiners, and an adjustable accelerator/speedbar.
The lightweight harness facilitates easy transition from running to seating. Testing on a training hill in calm conditions is recommended. The AirBag system enhances impact absorption.
Ensure all buckles and carabiners are secure before flight. Maintain a vertical posture during takeoff and use the speedbar cautiously in-flight.
Regularly check the reserve parachute handle location. In emergencies, deploy the parachute by pulling the handle and throwing it towards a clear area.
Clean with mild detergents, inspect carabiners and buckles regularly, and store in a dry, cool place away from UV exposure.
The harness has a five-year warranty against manufacturing defects. It is designed exclusively for paragliding, and misuse is not covered.
The AirBag provides impact protection but does not guarantee total injury prevention. Regular inspection is necessary.
Maintain a service record for scheduled maintenance and inspections. Contact SUP’AIR for repairs or warranty claims.
Catalog excerpts

User’s manual PARC ALTAÏS 34 RUE ADRASTÉE 74650 ANNECY CHAVANOD FRANCE
Open the catalog to page 1
Harness User’s manual | PIXAIR 2 hank you for choosing the PIXAIR 2 harness. We are glad to be able to share our common paragliding passion with you. SUP’AIR has been designing, producing and selling free flying equipment since 1984. By choosing a SUP’AIR product you benefit from almost thirty years of expertise, innovation and listening. Our mission statement: research and develop to constantly enhance. We hope you will find this user’s manual comprehensive, explicit and hopefully enjoyable as well. We advise you to read it carefully. You will find the lastest udated information about this product...
Open the catalog to page 2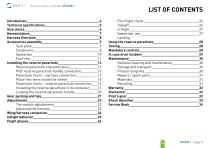
Harness User’s manual | PIXAIR 2 Introduction 4 Technical specifications 5 Size choice 6 Nomenclature 7 Harness Overview 8 Accessories assembly 9 Seat plate 9 Carabiners9 Speed-bar 10 Foot-rest 11 Installing the reserve parachute 12 Reserve parachute characteristics 12 POD reserve parachute handle connection 12 Parachute risers – harness connection 13 Place the risers inside the sleeve 15 Parachute risers – reserve parachute connection 16 Installing the reserve parachute in its container 17 Locking the reserve parachute handle 20 Gear packing and tips 21 Adjustments 22 The various adjustments...
Open the catalog to page 3
Harness User’s manual | PIXAIR 2 Welcome to the paragliding world according to SUPAIR; a world of shared passion. The PIXAIR 2 targets enthused pilots of all levels. It was designed with schooling and fun in mind to provide full comfort and a worry free learning curve. harness was certified EN 1651 and LTF 91/09 Indicating that it meets European and German safety requirements. After reading this manual, check your harness during a hang-test to fully adjust it before your first flight. N.B : Three important icons will help you when reading this manual
Open the catalog to page 4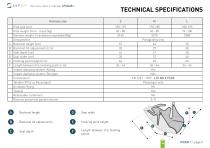
Harness User’s manual | PIXAIR 2 TECHNICAL SPECIFICATIONS Harness size Pilot size (cm) Pilot weight (mini - maxi) (kg) Harness weight (+carabiners+speedbar)(kg) Designed for Backrest height (cm) Backrest tilt adjustments (cm) Seat depth (cm) Seat width (cm) Hooking point height (cm) Length between the hooking points (cm) Impact damping system: Airbag Impact damping system: Bumpair Certification Tandem (Pilot or Passenger) Acrobatic flying Towing Releasable carabiners Reserve parachute pocket volume Backrest height Backrest tilt adjustments Seat width Hooking point height Seat depth Length between...
Open the catalog to page 5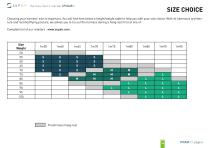
Harness User’s manual | PIXAIR 2 SIZE CHOICE Choosing your harness’ size is important. You will find here below a height/weight table to help you with your size choice. With its hammock architecture and reclined flying posture, we advise you to try out the harness during a hang-test first at one of. Complete list of our retailers : www.supair.com. Preliminary hang-test
Open the catalog to page 6
Harness User’s manual | PIXAIR 2 Zicral 30 mm carabiners « PXA2 » reserve parachute handle Polypropylene seat plate 2 x Mylar AIRBAG PXA2 (one for change) Options Double stage accelerator/speed-bar (ref. : CALEPIEDRETRACT20) Speed-bar/accelerator 2B light (ref: ACCELSOUPLELIGHT) Adjustable accelerator FreeSpee (ref: ACCELFREESPEE) Solo DYNEEMA risers (ref. : ELESOLODYNEEMA) Carbon seat plate (ref. :seat plate S 33*34cm: MPPL005) (ref. :seat plate M 35*37cm: MPPL006) (ref. :seat plate L: 37*37cm : MPPL007)
Open the catalog to page 7
Harness User’s manual | PIXAIR 2 HARNESS OVERVIEW Leg strap buckle Chest strap adjustement Backrest tilt adjustement Shoulder straps adjustement Reserve parachute pocket Reserve parachute handle Chest strap with automatic buckles Paragliding main hooking points 10 Reserve parachute hooking points 3 11 rSpeed bar / accelerator pulleys 12 AIRBAG 14 Radio and small storage pocket 8 15 Hydration tube opening 16 Back storage pocket 17 Speed-bar opening 18 Foot-rest buckle PIXAIR 2 | page 8
Open the catalog to page 8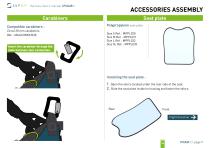
Harness User’s manual | PIXAIR 2 ACCESSORIES ASSEMBLY Carabiners Compatible carabiners : Insert the carabiner through the main harness riser connection. Seat plate Polypropylene seat plate Size S Ref. : MPPL030 Size M Ref. : MPPL031 Size L Ref. : MPPL032 Size XL Ref. : MPPL033 Installing the seat plate : 1. Open the velcro located under the rear side of the seat. 2. Slide the seat plate inside its housing and fasten the velcro. Front Flight direction
Open the catalog to page 9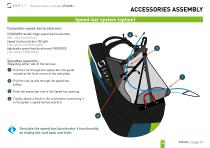
Harness User’s manual | PIXAIR 2 ACCESSORIES ASSEMBLY Speed-bar system (option) Compatible speed-bar/accelerator : STANDARD double stage speed-bar/accelerator (Réf. : ACCELSOUPLE) Speed-bar/accelerator 2B light ( ref: ACCELSOUPLELIGHT) Adjustable speed-bar/accelerator FREESPEE ( ref: ACCELFREESPEE) Speedbar assembly : Regarding either side of the harness: 1 Pull the line through the speed-bar line guide located at the front corner of the seat plate. Pull the line up and through the speed-bar pulley. Push the speed-bar line in the Speed-bar opening. Finally, attach a hook to the cord before connecting...
Open the catalog to page 10
Harness User’s manual | PIXAIR 2 ACCESSORIES ASSEMBLY Foot-rest (option) 1 Push the foot-rest strap through buckle located at the front of the harness’s side skirt. Push the elastic cord through the main hooking point located beneath the self-locking carabiner. Adjust the foot-rest length during a hang-test and stow away the straps excess in the elasticated holder.
Open the catalog to page 11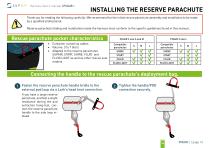
Harness User’s manual | PIXAIR 2 INSTALLING THE RESERVE PARACHUTE Thank you for reading the following carefully ! We recommend for the initial rescue parachute assembly and installation to be made by a qualified professional. Reserve parachute folding and installation inside the harness must conform to the specific guidelines found in this manual. Rescue parachute pocket characteristics • Container closed via cables • Volume: 3 to 7 liters • Adapted to the reserve parachutes SUPAIR, START, SHINE, FLUID and FLUID LIGHT as well as other rescue solo models. PIXAIR 2 size S and M Compatible parachutes...
Open the catalog to page 12All SupAir-VLD catalogs and technical brochures
 RADICAL 3
30 Pages
 VIP LITE
14 Pages
 EVEREST3
18 Pages
 MINIMAX BUMP
17 Pages
 EVO LITE
39 Pages
 DELIGHT 3
31 Pages
 SKYPPER 2
37 Pages
 ACRO 4
34 Pages
 ALTIRANDO LITE
33 Pages
 ACCESS 2 BUMP
38 Pages
 ACCESS 2 AIRBAG
37 Pages
 MINIMAX 3
22 Pages
 WALIBI 3
38 Pages
 STRIKE 2
40 Pages
 KINDER 2
20 Pages
 LOUSTIC 2
20 Pages
 FLUID
FLUID30 Pages
 START
START15 Pages
 SHINE
SHINE22 Pages
 STEP
STEP36 Pages
 LEAF 2
36 Pages
 LEAF 2 LIGHT
32 Pages
 SAVAGE
30 Pages
 STEP light
29 Pages
 SORA 2 PLUS
28 Pages
 EONA 3
36 Pages
 CATALOGUE SUPAIR 2017 2018
39 Pages

- Sport paraglider
- Paraglider
- Single place paraglider
- Performance paraglider
- Single place free flight harness
- Paragliding free flight harness
- Reserve parachute
- Single place parachute
- Light free flight harness
- Sport parachute
- Seated position free flight harness
- Mountain paraglider
- Performance parachute
- Intermediate paraglider
- Cross paraglider
- Airbag harness bag
- Beginner paraglider
- Two place paraglider
- Two place parachute