
- Catalogs
- SupAir-VLD
- LEAF 2

LEAF 2

LEAF 2
The LEAF2 glider is designed for intermediate pilots, ideal for leisure and cross-country flying. It offers high comfort and is certified under EN 926-1:2006 & 926-2:2013 Class B, ensuring passive safety and stability.
The glider is available in five sizes (XS, S, M, ML, L) with different surface areas, spans, and weights. It has a flat aspect ratio of 5.3, includes a speed system, but lacks a trimmer.
The manual details the glider's components such as risers, brake handles, and the speedbar system, accompanied by a diagram for clarity.
Instructions for connecting the glider to the harness using self-locking carabiners are provided, emphasizing the choice of an appropriate harness and accelerator adjustment.
A thorough check of the glider and harness is necessary before each flight, ensuring all connections are secure and the reserve parachute is correctly positioned.
The LEAF2 is designed for easy inflation in various wind conditions, with both forward and reverse launch techniques described and safety precautions highlighted.
Tips for optimizing flight performance include using the speedbar and alternative direction control methods, with advice on making turns and landing safely.
The glider can be towed but is not designed for aerobatics or tandem flying. Proper landing techniques are outlined, including handling high wind conditions.
Emergency descent techniques such as Big Ears and 360° spiral dives are described, focusing on safety and the need for prior training.
Regular maintenance checks are mandatory for safety and longevity. The manual covers recycling, warranty, and disclaimer information.
- Spiral Dive: Exiting should be gradual using the outside and upper brake to control the glider's surge and dive. This maneuver is physically demanding and can cause temporary loss of consciousness due to high G-forces.
- B-line Stall: Increases the wing's sink rate by pulling the B risers. To return to normal flight, release the B risers and control the forward surge.
- Parachutal Stall: Occurs when the glider descends vertically without forward motion. To recover, release brakes and use the speed bar.
- Asymmetric and Front Collapses: In case of collapses, shift weight to the open side and use brakes to stabilize. For front collapses, release brakes and allow the wing to reopen naturally.
The manual advises against aerobatic maneuvers as they can cause premature aging of the glider and are not safe descent techniques.
- The glider is constructed using Porcher Sport fabrics and Liros and Edelrid lines, with specific references for each component.
- Line lengths and riser measurements are provided for different glider sizes (XS, S, M, ML), with tolerances specified for maintenance checks.
Regular washing of the glider is recommended using a sponge or soft brush with a non-aggressive cleaning agent. Inspections should be conducted annually or every 100 flight hours. Small fabric damages can be repaired with included ripstop pieces. Storage should be in a dry, cool place away from UV exposure.
The glider should be serviced regularly, focusing on lines, maillons, and carabiners. Carabiners should be replaced every five years. SUPAIR offers repair services beyond the warranty period.
Spare parts such as suspension and brake lines, riser maillons, and whole risers can be ordered. The glider is designed with environmentally friendly materials, and recycling guidelines are provided.
Paragliding requires specific skills and knowledge. SUPAIR emphasizes the importance of training, insurance, and appropriate gear. The product is designed for solo use only, and SUPAIR is not responsible for paragliding decisions.
SUPAIR offers a 3-year limited warranty against manufacturing defects. Users are encouraged to respect the environment by minimizing noise and not littering.
SUPAIR's contact details are provided for further inquiries.
Catalog excerpts

Glider user's manual | LEAF2 User’s manual SUPAIR 34 rue Adrastée Parc Altaïs 74650 Annecy - Chavanod FRANCE 45°54.024’N / 06°04.725’E SUPAIR | LEAF2 |
Open the catalog to page 1
Glider user's manual | LEAF2 Thank you for choosing to fly our LEAF2 to paraglide with. We are delighted to have you on-board to share our passion for paragliding. SUPAIR has been designing producing and selling accessories for free flying activities since 1984. By choosing a SUPAIR product you benefit from almost thirty years of expertise, innovation and customer care. We pride ourselves for our work ethics and customer care. We hope you will find this user's manual comprehensive, explicit and hopefully enjoyable as well. We advise you to read it carefully. You will find the latest information...
Open the catalog to page 2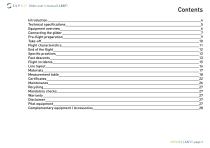
Glider user's manual | LEAF2 Introduction Technical specifications Equipment overview Connecting the glider Pre-flight preparation Take-off Flight characteristics End of the flight Specific practices Fast descents Flight incidents Line layout Materials Measurement table Certificates Maintenance Recycling Mandatory checks Warranty Disclaimer Pilot equipment Complementary equipment / Accessories
Open the catalog to page 3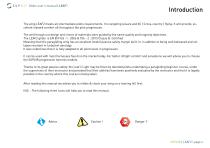
Glider user's manual | LEAF2 The wing LEAF2 meets all intermediate pilots requirements. It is targeting leisure and XC ( Cross-country ) flying. It will provide, excellent inboard comfort all throughout the pilot progression. The well though out design and choice of materials were guided by the same quality and longevity objectives. The LEAF2 glider is EN EN 926 -1 : 2006 & 926 - 2 : 2013 Classe B. Certified. Meaning that this paragliding wing has an excellent levelof passive safety margin built-in, in addition to being well beheaved and collapse resistant in turbulent aerology. It also underlines...
Open the catalog to page 4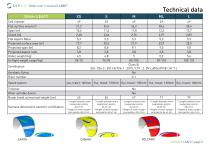
Glider user's manual | LEAF2 Glider LEAF2 Cell number Flat surface area (m²) Span (m) Chord (m) Flat Aspect Ratio Projected surface area (m²) Projected span (m) Projected aspect ratio Glider weight (kg) In-flight weight range (kg) Certification Acrobatic flying Riser number Speed system Trimmer Other variable device Break travel at maximal weight (cm) Harness dimensions used for certification yes, tralel: 140mm Oui, travel: 150mm Oui, travel: 150mm Oui, travel: 160mm Oui, travel: 160mm * Length between main suspension points: 40 ±2 cm * Height of main suspension points: 40 ±1 cm * Length between...
Open the catalog to page 5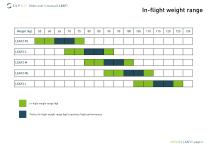
Glider user's manual | LEAF2 In-flight weight range 75 In-flight weight range (kg) Perfect In-flight weight range (kg) to optimize flight performances
Open the catalog to page 6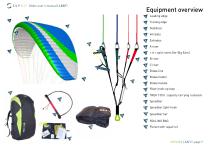
Glider user's manual | LEAF2 Brake holder Brake handle Riser hook-up loop TREK 130 lt. capacity carrying rucksack Speedbar Speedbar Split-hook Brake line « A » split risers (for Big Ears) Trailing edge Leading edge Pocket with repair kit
Open the catalog to page 7
Glider user's manual | LEAF2 Choose a flat or lightly angled training hill without obstacles or wind. Open your wing and arrange it in a crescent shape. Check the fabric and the lines for any sign of wear or damage. Check for the links connecting the lines to the risers to be fully closed. Identify, separate and arrange the A,B.C, risers as well as the brake lines neatly. Knots or tangles can not be present. Choosing an adapted harness The LEAF2 glider was certified EN B with a EN1651 & LTF certified harness and hence can be flown with most harnesses models found on the market today. Meaning...
Open the catalog to page 8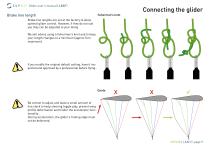
Glider user's manual | LEAF2 Brake line length fisherman's knot Brake line lengths are set at the factory to allow optimal glider control. However, if they do not suit you they can be adjusted to your liking. We will advise using a fisherman's knot and to keep your length changes to a minimum (approx 5cm maximum). If you modify the original default setting, have it inspected and approved by a professional before flying.. Be certain to adjust and leave a small amount of line slack to keep steering toggle play, prevent wing profile deformation and hinder the accelerator functionality. During acceleration,...
Open the catalog to page 9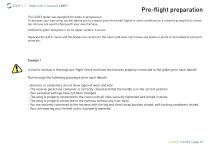
Glider user's manual | LEAF2 Pre-flight preparation The LEAF2 glider was designed for pilots in progression. To discover your new wing, we will advise you to conduct your first small flights in calm conditions on a school training hill or a familiar site you are used to flying with your own harness. Unfold the glider and place it on its upper surface in an arc. Separate the A,B,C risers and the brakes, be certain for the risers and lines not to have any twists or knots or be hooked to a branch, stone etc... Caution ! It vital to conduct a thorough pre-flight check and have the harness properly...
Open the catalog to page 10
Glider user's manual | LEAF2 The design team has strived to produce the LEAF2 wing with optimum inflating abilities in all flyable conditions. Whether it be in light or high winds you will enjoy its docile behavior while launching. However before the first flight, practice ground-handling to become familiar with your new glider. It is possible to inflate in a front- or reversed-launch method. Forward launch To inflate the glider grab the upper ends of the "A" risers with your hands and progressively move foreward guiding the glider upward. Once the wing is flying overhead, apply brakes as necessary,...
Open the catalog to page 11
Glider user's manual | LEAF2 Here are a few tips to take advantage of your LEAF2 wing's performance in flight: Flight caracteristics « Hands up » speed or trim speed Flying « hands up » will provide the best glide ratio in nil wind. Turns To make your glider turn efficiently, and only after checking that the space below you is clear and safe to land on, weight shift toward the inside of the turn and progressively pull your brake/toggle on the same side until the desired turning angle is reached. The turning speed and radius can also be adjusted by using the other brake/toggle controlling the...
Open the catalog to page 12
Glider user's manual | LEAF2 Landing Be certain to always have enough altitude for a safe landing before approaching the chosen Landing Zone ( PTU, PTS, etc...). Never make aggressive maneuvers close to the ground. Always land into the wind ( upwind ), standing up and ready to run to a stop if necessary. Make your landing approach with maximum air speed if possible depending on the weather conditions of the moment, then progressively brake to slow the glider to a final touchdown. Beware not to brake too much, too soon and too rapidly to prevent a possible stall and hard landing. In case of a...
Open the catalog to page 13All SupAir-VLD catalogs and technical brochures
 RADICAL 3
30 Pages
 VIP LITE
14 Pages
 EVEREST3
18 Pages
 MINIMAX BUMP
17 Pages
 EVO LITE
39 Pages
 DELIGHT 3
31 Pages
 SKYPPER 2
37 Pages
 ACRO 4
34 Pages
 ALTIRANDO LITE
33 Pages
 PIXAIR 2
35 Pages
 ACCESS 2 BUMP
38 Pages
 ACCESS 2 AIRBAG
37 Pages
 MINIMAX 3
22 Pages
 WALIBI 3
38 Pages
 STRIKE 2
40 Pages
 KINDER 2
20 Pages
 LOUSTIC 2
20 Pages
 FLUID
FLUID30 Pages
 START
START15 Pages
 SHINE
SHINE22 Pages
 STEP
STEP36 Pages
 LEAF 2 LIGHT
32 Pages
 SAVAGE
30 Pages
 STEP light
29 Pages
 SORA 2 PLUS
28 Pages
 EONA 3
36 Pages
 CATALOGUE SUPAIR 2017 2018
39 Pages

- Sport paraglider
- Paraglider
- Single place paraglider
- Performance paraglider
- Single place free flight harness
- Paragliding free flight harness
- Reserve parachute
- Single place parachute
- Light free flight harness
- Sport parachute
- Seated position free flight harness
- Mountain paraglider
- Performance parachute
- Intermediate paraglider
- Cross paraglider
- Airbag harness bag
- Beginner paraglider
- Two place paraglider
- Two place parachute