- Catalogs
- STRATASYS GMBH
- Fortus® 380/450mc
Fortus® 380/450mc

Fortus® 380/450mc
This document provides comprehensive instructions for the receipt, unpacking, and installation of the Fortus 380mc and 450mc printers, highlighting necessary tools, safety precautions, and service connections.
The Fortus 380mc and 450mc printers utilize Fused Deposition Modeling (FDM) technology for creating precise prototypes and support Direct Digital Manufacturing (DDM) for customized parts. Key features include a servo/belt driven XY gantry and high-temperature modeling material capability.
Each printer package includes the printer, material packages, a welcome kit with user documentation and tools, but not a computer workstation.
- Maximum build area: 14 x 12 x 12 inches (356 x 305 x 305 mm)
- Material Canister Bays: 1 model, 1 support
- Touchscreen Graphical User Interface
- Maximum build area: 16 x 14 x 16 inches (406 x 356 x 406 mm)
- Material Canister Bays: 2 model, 2 support
- Touchscreen Graphical User Interface
Selecting the Site
Consider space, environmental, electrical, and LAN requirements when selecting a site.
Ensure the site can accommodate the printer's dimensions and weight, with necessary clearances. The printer can fit through a standard 36-inch door with panels installed.
- Indoor use only
- Operating temperature: 65°F to 86°F (18°C to 30°C)
- Storage temperature: -40°F to 129.2°F (-40°C to 54°C)
- Humidity: 30% to 70% non-condensing
- Altitude: Max 6561.68 feet (2000 m)
- Noise: <65dBA idle, <66dBA building
- 50/60 Hz 5 wire (LLL+N+PE) dedicated circuit
- Voltage: 120/208 VAC 3 phase nominal
- Current: 18A
- In-rush: 50 Amps max for <10 ms, 21 Amps max for <20 s
- Optional UPS connectivity and AC transformers available
A LAN connection is necessary for communication and file transfer, using a 100 base T, Ethernet connection.
Inspect the crate for damage upon receipt and report any damage to Stratasys and the shipping company.
Ensure required tools and equipment are available for unpacking and setup.
Inspect Tip Indicators and ShockWatch indicator for damage. Remove cover mount screws and shipping bands carefully. Use a forklift or ramp to remove the printer from the shipping base.
Use either the forklift method or ramp method to safely remove the printer from the shipping base.
Use an Allen wrench to loosen fasteners and remove rear panels and top cover. Disconnect fan wiring and remove p-clamp mounting screws.
Connect the printer to the electrical service terminal block following specified line connections. A licensed electrician must perform all AC electrical service connections.
Follow basic safety tips for installation, operation, and maintenance. Ensure equipment is connected to a grounded power source and know the location of circuit breakers and fire extinguishers.
Stratasys contact details and ISO certification information are provided for further assistance.
Catalog excerpts
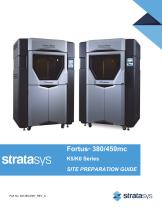
Fortus® 380/450mc K5/K0 Series SITE PREPARATION GUIDE
Open the catalog to page 1
LIABILITY STATEMENT The information in this document is subject to change without notice. Stratasys, Inc. makes no warranty of any kind with regard to this material, including, but not limited to, the implied warranties of merchantability and fitness for a particular purpose. Stratasys, Inc. shall not be liable for errors contained herein or for incidental or consequential damages in connection with the furnishing, performance, or use of this material. This document is protected by copyright. All rights reserved. Its use, disclosure, and possession are restricted by an agreement with Stratasys...
Open the catalog to page 2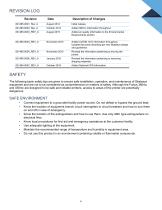
REVISION LOG Revision Date Description of Changes 821465-0002, Rev. A October 2014 Added 380mc information throughout. 821465-0003_REV_A August 2015 Added air quality information to the Environmental Requirements section. 821465-0004_REV_A November 2015 Added ULTEM 1010 information throughout. Updated document branding per new Stratasys design and guidelines. 821465-0005_REV_A November 2015 Revised the information pertaining to moving the printer. 821465-0006_REV_A January 2016 Revised the information pertaining to removing shipping materials. 821465-0007_REV_A October...
Open the catalog to page 4
ABOUT THE FORTUS 380MC & 450MC The 380mc and 450mc printers incorporate the latest in innovative technologies to provide you with precise prototypes from a CAD design. Stratasys’ Fused Deposition Modeling (FDM) technology provides prototype parts, including internal features, that can be used to field-test form, fit, and function. Direct Digital Manufacturing (DDM) allows for the creation of customized end-use parts straight from 3D CAD data. The 380mc/450mc features a servo/belt driven XY gantry with multiple high temperature modeling material capability. The 380mc or 450mc Printer (depending...
Open the catalog to page 5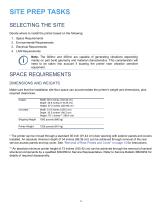
SITE PREP TASKS SELECTING THE SITE Decide where to install the printer based on the following: 1. Space Requirements 2. Environmental Requirements 3. Electrical Requirements 4. LAN Requirements Note: The 380mc and 450mc are capable of generating vibrations depending mainly on part build geometry and material characteristics. This consideration will need to be taken into account if locating the printer near vibration sensitive equipment. SPACE REQUIREMENTS DIMENSIONS AND WEIGHTS Make sure that the installation site floor space can accommodate the printer’s weight and dimensions, plus required...
Open the catalog to page 6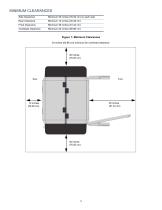
Side Clearance Minimum 30 inches (76.20 cm) on each side 24 inches (60.96 cm) minimum for overhead clearance
Open the catalog to page 7
• The 380mc and 450mc are for indoor use only. • Air quality conditions with excessive solid particulates (conductive or non-conductive) may result in system damage. • Air quality conditions in which airborne oils are allowed to accumulate on or within the printer can damage the plastic components. • Operating temperature shall be in the range of 65°F to 86°F (18°C to 30°C), with relative humidity range of 30% to 70% non-condensing. • Storage temperature shall be in the range of -40°F to 129.2°F (-40°C to 54°C), with relative humidity range of 10% to 85% non-condensing. • Altitude shall not exceed...
Open the catalog to page 8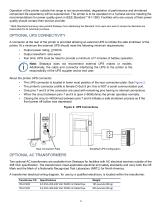
Operation of the printer outside this range is not recommended; degradation of performance and shortened component life expectancy will be experienced. The printer is to be operated on a 3-phase service meeting the recommendations for power quality given in IEEE Standard 12141-1993. Facilities who are unsure of their power quality should contact their service provider. * IEEE Standards licensing rules prohibit Stratasys from distributing the Standard. End users who wish to review the Standard are responsible for its individual purchase. OPTIONAL UPS CONNECTIVITY A connector at the rear of the...
Open the catalog to page 9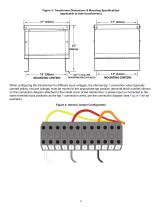
Figure 3: Transformer Dimensions & Mounting Specifications (applicable to both transformers) When configuring the transformer for different input voltages, the internal tap 1 connection wires (typically colored yellow, red and orange) must be moved to the appropriate tap position (terminal block number) shown on the connection diagram attached to the inside cover of the transformer. 3 phase input is connected to the same terminal block positions as the tap 1 connection wires, per the connection diagram (see Figure 4 for an example). Figure 4: Internal Jumper Configuration
Open the catalog to page 10
LAN REQUIREMENTS A LAN connection is required for communication and file transfer functions. The LAN connection is a 100 base T, Ethernet protocol, RJ45 connector. One 25 foot (7.62 m) CAT5, 10/100 base T cable is supplied with the printer, located in the Startup Kit. The printer will function in either DHCP or Static IP configurations. Note: Printers configured with a network option of UPnP=ON will occasionally broadcast a unique system identifier across the network for use by the Insight FDM Control Center software application. Refer to Insight’s user information for workstation requirements....
Open the catalog to page 11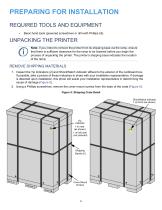
PREPARING FOR INSTALLATION REQUIRED TOOLS AND EQUIPMENT • Basic hand tools (powered screwdriver or drill with Phillips bit). UNPACKING THE PRINTER Note: If you intend to remove the printer from its shipping base via the ramp, ensure that there is sufficient clearance for the ramp to be lowered before you begin the process of unpacking the printer. The printer’s shipping base indicates the location of the ramp. REMOVE SHIPPING MATERIALS 1. Inspect the Tip Indicators (2) and ShockWatch indicator affixed to the exterior of the cardboard box. If possible, take a picture of these indicators to share...
Open the catalog to page 12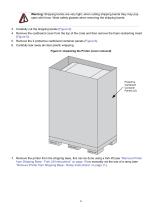
Warning: Shipping bands are very tight; when cutting shipping bands they may pop open with force. Wear safety glasses when removing the shipping bands. 3. Carefully cut the shipping bands (Figure 5). 4. Remove the cardboard cover from the top of the crate and then remove the foam restraining insert (Figure 6). 5. Remove the 2 protective cardboard container panels (Figure 6). 6. Carefully tear away all clear plastic wrapping. Figure 6: Unpacking the Printer (cover removed) Protective Cardboard Container Panels (x2) 7. Remove the printer from the shipping base, this can be done using a fork lift...
Open the catalog to page 13All STRATASYS GMBH catalogs and technical brochures
 OBJET30
2 Pages
 Objet1000 Plus
2 Pages
 The Stratasys F123 Series
4 Pages
 uPrint® SE/uPrint® SE Plus
12 Pages
 J750 spec sheet
4 Pages
 Fortus 900mc spec sheet
2 Pages


