- Catalogs
- Simplify-ppg GmbH
- Handbuch_Simplify_X3_small_17.04.14
Handbuch_Simplify_X3_small_17.04.14

Handbuch_Simplify_X3_small_17.04.14
Introduction and Purpose
The Simplify X3 Paramotor is a lightweight, single-seat motorized paraglider weighing under 120 kg. This manual provides essential information on operation, maintenance, and safety to ensure proper use. Users must comply with legal regulations and assume responsibility for their safety. The manufacturer disclaims liability for damages or injuries resulting from use.
Flight Safety and Operational Limits
Operators must thoroughly understand the paramotor and monitor safety updates. Flights are only permitted in calm weather, avoiding rain, gusty winds, or wind speeds above 25 km/h. Carburetor icing conditions are prohibited. Modifications void warranty and operating permits. The paramotor is designed for solo flights only; tandem and aerobatic flights are forbidden. Any malfunction or limit exceedance requires immediate flight termination and consultation with the manufacturer before reuse.
Emergency Procedures
Pilots should practice engine-off landings and be ready to deploy the rescue parachute if the wing fails. The rescue device must be deployed into clear airspace to prevent entanglement. In water or strong wind landings, quick release from the harness is essential. In tree landings, secure yourself and await professional assistance. Mental rehearsal of rescue deployment before each flight is strongly recommended.
Warnings and Safety Instructions
Operation is restricted to authorized sites and compliant with aviation regulations. Pilots must be trained and licensed; unlicensed pilots require instructor supervision. Only manufacturer-approved wings are allowed. Flying under the influence of drugs, alcohol, or strong medication is strictly prohibited. Protective gear and a certified rescue system are mandatory. Engine start on the ground is forbidden due to injury risk. Avoid contact with hot parts and the rotating propeller. Fuel tanks must be ventilated to prevent deformation from temperature changes.
Environmental and Landscape Considerations
Pilots should respect nature by flying only in approved areas, minimizing noise and environmental impact. Avoid low flights over populated or protected zones. Flight activity should be distributed to reduce disturbance. Avoid unnecessary motor warm-up or full throttle runs before takeoff to lessen environmental harm.
Frame Assembly and Harness Setup
The paramotor arrives ready to fly, requiring assembly of the protective cage, propeller, and rescue system. Carbon rods are inserted into cage mounts; the cage ring is assembled with attention to spring locks and net positioning behind the rescue container. The net must be evenly tensioned for frame stability. The harness attaches to the frame via Velcro and straps, connecting to push rods with screw shackles. Shoulder straps are adjustable, and a leg stretcher is included for comfort. The harness supports speed systems if compatible with the wing.
Main Suspension and Connectors
Only manufacturer-supplied main carabiners rated for 22 kN breaking load and certified for 9G loads must be used to connect the paramotor to the wing, ensuring structural integrity and pilot safety.
1. Push Rods Installation and Adjustment
Push rods are mounted with a right offset to compensate torque, secured by an M10 x 80 screw with a self-locking nut. No further torque compensation is needed due to the paramotor's design. Push rods connect to the harness via screw shackles, which must be secured. Suspension points are adjusted based on pilot weight (e.g., 95 kg pilots use specific engraved markings). Balance must be verified by hanging the motor, harness, and pilot before the first flight. Dealer consultation is advised.
2. Rescue System and Attachment
The rescue system is housed in a special external container attached to the detachable frame with sewn straps. It accommodates modern lightweight rescue devices (e.g., Annular EVO 24). The container allows deployment with either hand and is fixed to the main frame to prevent detachment. Installation must be performed by the seller or qualified professional. Rescue lines connect to main harness straps at red-marked suspension points rated for at least 1350 daN (9 times MTOW). A professional deployment test is mandatory after installation.
3. Propeller Types and Mounting
The paramotor supports approved wooden and carbon propellers. Wooden propellers must be mounted with the logo facing outward/back and balance weight toward the motor, secured with six screws tightened crosswise to 10 Nm. The 3-blade carbon HELIX propeller is assembled from three parts with the label outward and attached with six screws tightened to 12 Nm. Proper torque tools are required.
4. Throttle Control
The standard throttle grip is lightweight, right-hand mounted, and secured against slipping. It controls throttle input and includes an engine stop button. Functionality must be checked before each flight. Left-side installation is available on request.
5. Fuel and Oil Mixture
The engine uses a gasoline-oil mixture with Castrol Racing 2T oil and 98 octane gasoline. During break-in (first tank), use 4% oil; thereafter, 2.5%. The carburetor is primed via a side bulb pump. The engine is factory-tuned for ~400 m altitude; carburetor adjustments are prohibited to avoid damage and warranty loss. Idle speed is adjustable between 2000-2200 rpm (warm engine). The mixture screw controls fuel richness; improper settings cause hesitation or rough running. Basic mixture setting: fully screw in, then back out 1 1/4 turns.
6. Pre-Flight Checks
- Verify cage assembly and net tension
- Inspect cage, net, and propeller for damage
- Check propeller screws and hub play
- Test throttle kill switch
- Confirm fuel quality and oil ratio
- Check fuel system for leaks and ventilated cap
- Check coolant level
- Inspect pilot suspension components
- Perform full throttle engine test
- Inspect wing
- Check starter rope and recoil
Engine start on the ground is discouraged due to injury risk. Start engine by pulling starter cord with motor on back after priming. Warm up at half throttle for ~3 minutes. If no start, try with throttle applied. Beware of immediate propeller acceleration due to centrifugal clutch.
7. Technical Specifications
- Engine: Sky Engine Sky 1.1 TTS, 110 cc, 28 HP
- Centrifugal clutch: Yes
- Manual start
- Thrust: >75 kg (wood propeller), >85 kg (carbon propeller)
- Fuel: 98 octane gasoline
- Oil: Castrol Racing 2T
- Fuel tank capacity: 12 L
- Spark plug: BR 9 ES
- Flight duration: approx. 3.5 hours
- Cage: Stainless steel round tube, 1400 mm diameter
- Frame dimensions (WxHxD): 530 x 1025 x 320 mm
- Max motor width: 600 mm
- Push rod height: 585 mm
- Propellers: Wood SE2BX3PH, Carbon SE3BX3PK
- Total weight (ready to fly without fuel): 24.9 kg
- Max takeoff weight: 140 kg
- Recommended pilot weight: 75–110 kg
- Harness: Sky Equipment PPG
- Includes rescue container, propeller covers, and protective cage bag
8. Torque Specifications
- Wood propeller screws: 10 Nm
- Carbon propeller screws: 12 Nm
- Propeller central screw: 40 Nm
- Spark plug: 20 Nm
- Cylinder head screws: 14 Nm
- Exhaust mount: 10 Nm
- Muffler/exhaust: 15 Nm
- Carburetor mount: 8 Nm
- Standard screw torque by size: 5 mm = 6 Nm, 6 mm = 10 Nm, 8 mm = 25 Nm, 10 mm = 45 Nm, 12 mm = 55 Nm
9. Cleaning and Maintenance
Clean the paramotor after each flight. Remove oil and gasoline residues with brake cleaner spray; other dirt with water and mild soap. For short transport lying down, keep fuel tank nearly empty to prevent deformation. Use supplied protective bags for frame and propeller during transport. Store in a dry place, ideally covered with the protective cover. For long-term storage, remove wooden propellers and store flat in a dry, dark place.
10. Inspection, Maintenance, and Repairs
Perform pre-flight checks before each flight. After 10 flight hours, inspect fuel filter, exhaust springs, motor rubber elements, airbox, exhaust, and fuel tank. After 50 hours, replace motor suspension rubbers, inspect intake and muffler rubbers, replace spark plug, check screws and wiring, inspect throttle cable, change gearbox oil (25 ml Klüber Lamora 150), and replace coolant (BASF G48, 600 ml radiator, 100 ml reservoir). Repairs must be done by authorized partners or manufacturer using original parts. After 100 hours or 12 months, a full inspection and service by authorized Simplify service partner is mandatory. Failure to comply voids warranty.
Warranty Information
The paramotor is warranted for 12 months from purchase, activated via warranty card or online. Warranty covers defects in materials and workmanship, including parts and labor, excluding shipping. Warranty is voided by unauthorized modifications, improper maintenance, transport damage, overload, incorrect fuels/oils, contamination, improper storage, incorrect assembly, third-party damage, or unauthorized repairs. Claims require proof of purchase and flight log. Warranty obligations are limited to repair or replacement of defective parts. The manufacturer and distributors disclaim liability for damages related to motor use. Users assume full risk, acknowledging potential sudden motor failure and associated hazards.
Spare Parts
Only original spare parts should be used, available from authorized dealers or the manufacturer. A spare parts list is accessible online.
Copyright Notice
This manual is copyrighted by Sky Equipment Austria. Reproduction is prohibited. The company disclaims liability for damages arising from the brochure content.
Additional Notes
The document references measurement protocols for wooden 2-blade and carbon 3-blade propellers, indicating technical data related to these components, though specific data is not included.
Catalog excerpts

! Wir!freuen!uns,!dass!du!dich!für!einen!Simplify!Paramotor!entschieden!hast.!Um!einen!sicheren!Umgang!mit! deinem!Simplify!Paramotor!gewährleisten!zu!können,!haben!wir!dieses!Handbuch!geschrieben.!Es!enthält! detaillierte!Informationen!für!die!Nutzung!des!Gerätes,!speziell!zur!Funktion!des!Motors,!der!Pflege!sowie!der! Handhabung!des!gesamten!Antriebes.!Die!technischen!Angaben,!Abbildungen!und!Maße!in!dieser!Anleitung! sind!unverbindlich.! ! Irgendwelche!Ansprüche!können!daraus!nicht!abgeleitet!werden.!Wir!behalten!uns!vor,!Verbesserungen! vorzunehmen!ohne!diese!Anleitung!zu!ändern.!Um!eine!langjährige!Lebensdauer!deines!Paramotors!...
Open the catalog to page 2
Flugsicherheit! Dieses!Handbuch!wurde!erstellt,!um!dich!mit!dem!Simplify!Paramotor!vertraut!zu!machen!und!damit!die! Flugsicherheit!zu!erhöhen.!Zum!Fliegen!des!Simplify!Paramotors!müssen!die!gesetzlichen!Bestimmungen!! eingehalten!werden.!Es!ist!deine!Pflicht!dieses!Handbuch!zu!lesen,!um!dich!mit!dem!Motor!und!der!sonstigen! Ausrüstung!vertraut!zu!machen.!Lese!regelmäßig!die!Flugsicherheitsmitteilungen!auf!unserer!Webseite!sowie! in!den!verschiedenen!Publikationen,!um!immer!auf!dem!aktuellsten!Stand!zu!sein.!Registriere!dich!umgehend! nach!dem!Kauf!auf!unserer!Webseite.!Nur!so!können!wir!sicherstellen,!dass!du!über!alle!Sicherheitshinweise!...
Open the catalog to page 4
PARAMOTOR!!!!!!!!!!!!!!!!!!!!!!!!!!!!!!!!!!!!!!!!!!Simplify!X!3! ! ! Gehe!bei!jedem!Flug!gedanklich!das!Auslösen!des!Rettungsgerätes!durch.!Dies!hilft!dir!im!Ernstfall!den! Rettungsschirm!schnell!auszulösen.!Bei!einer!Wasser#!und/oder!Starkwindlandung!sollte!sich!der!Pilot!so! schnell!wie!möglich!vom!Gurtzeug!trennen.!Kommt!es!zu!einer!Baumlandung,!so!solltest!!du!dich!als!erstes!am! Baum!sichern!und!dann!auf!professionelle!Hilfe!warten.!Entgegen!der!genannten!Empfehlungen!ist!es! möglich,!dass!ein!anderes!Verhalten!als!beschrieben!erforderlich!ist.!Die!Vielzahl!an!möglichen!Situationen! lässt!keine!allgemein!gültige,!Verhaltensweise!zu!und!ist!vom!Piloten!von!Fall!zu!Fall!zu!entscheiden.!...
Open the catalog to page 5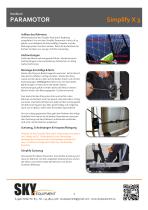
Werksseitig!wird!der!Simplify!Paramotor!flugfertig! ausgeliefert.!Um!mit!dem!Simplify!Paramotor!in!die!Luft!zu! gehen,!muss!lediglich!der!Schutzkäfig,!Propeller!und!das! Rettungssystem!montiert!werden.!Dank!der!Einfachheit!der! Einheit!sind!dazu!nur!wenige!!Schritte!notwendig.!!! ! Stelle!den!Motor!auf!eine!gerade!Fläche.!Stecke!die!sechs! Karbonstangen!in!die!vorhandenen!Aufnahmen!am!Käfig! (siehe!Zeichnung).! ! Stecke!den!Ring!am!Boden!liegend!zusammen.!Achte!darauf,! dass!die!Druckfedern!richtig!einrasten.!Stecke!den!Ring! zuerst!auf!die!oberen,!dann!auf!die!beiden!linken!und!rechten! Karbonstangen.!Achtung!!Das!Netz!muss!mit!den!beiden!!...
Open the catalog to page 7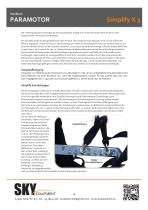
Die!Einstellung!des!Gurtes!gestaltet!sich!sehr!einfach.!Die!Länge!der!Schultergurte!wird!auf!die!Größe!des! Piloten!angepasst.!Setze!dich!dazu!in!das!Gurtzeug!und!ziehe!die!Schultergurte!links!und!rechts!soweit!an!bis! du!einen!leichten!Druck!auf!der!Schulter!verspürst.!Zum!Lösen!ziehst!du!die!orange!Schlaufe!(letztes!Bild!Seite! 7)!nach!oben.!Jetzt!kannst!du!den!im!Lieferumfang!enthaltenen!Beinstrecker!auf!deine!Beinlänge!einstellen! und!eventuell!die!Neigung!der!Sitzbrettverlängerung!etwas!korrigieren!und!fertig!ist!die!Einstellung!des! Gurtzeuges.!Alles!andere!ist!voreingestellt!und!!darf!nicht!!verändert!werden.!Durch!die!Verwendung!des!...
Open the catalog to page 8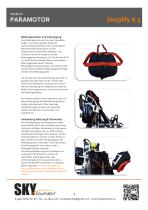
Das!Rettungssystem!wird!in!einem!speziellen! Außen#!Container!(welcher!bereits!im! Lieferumfang!enthalten!ist)!am!aufsteckbaren! Rahmenteil!des!Paramotors!mit!den! angebrachten!Gurtbändern!befestigt!.!Der! Container!ist!nur!für!moderne,!leichte! Rettungsgeräte!konzipiert,!z.B.!Typ!Annular!EVO! 24.!Achte!bei!der!Auswahl!des!zu!verwendeten! Rettungsgerätes!darauf,!dass!die! Betriebsgrenzen!des!Gerätes!nicht!überschritten! werden!(siehe!Handbuch!Rettungsgerät)!!Fliege! niemals!ohne!Rettungsgerät! Die!Position!der!Containeranbringung!wurde!so! gewählt,!dass!der!Pilot!mit!der!rechten!oder! linken!Hand!die!Reserve!auslösen!kann.!Durch!...
Open the catalog to page 9
! Der!„Simplify!Paramotor“!kann!mit!einem!Holz#!!oder! Karbon#!Propeller!betrieben!werden.!Unter!„Technische! Daten“!findest!du!den!für!deinen!Paramotor! zugelassenen!Propeller.!Sieh!dir!!dazu!auch!das! Lärmmessprotokoll!am!Ende!dieses!Handbuches!an.! ! ! Beachte!bei!der!Montage,!dass!die!richtige!Seite!des! Propellers!nach!außen!bzw.!hinten!zeigt!(Schriftzug! außen!/!hinten!und!Auswuchtgewicht!zum!Motor).!! ! Befestige!den!Propeller!mit!den!6!Schrauben!auf!dem! Flansch!des!Getriebes.!Ziehe!die!Schrauben!über!Kreuz! mit!10!Nm!an.!Für!die!exakte!Befestigung!benötigst!du! einen!Drehmomentschlüssel.!!...
Open the catalog to page 10
! Tanken!–!Benzin!&!Öl! Der!Simplify!Paramotor!wird!mit!einem!Tankdeckel!mit! Belüftungsventil!für!den!Flugbetrieb!ausgeliefert!(siehe! Bild!2).!Ein!Tankdeckel!ohne!Belüftung!sollte!nur!kurzzeitig! zum!Transport!verwendet!werden,!da!sich!im!Tank!ein! Über#!oder!Unterdruck!einstellen!kann,!der!zu!starken! Verformungen!des!Tanks!führen!könnte.!! Benzin!&!Öl!! Der!Motor!wird!mit!einem!Benzinölgemisch!betrieben,! bitte!verwende!nur!Castrol!Racing!2T!mit!98!Oktan! Superbenzin.!Zur!Einlaufphase!(erste!Tankfüllung)!wird! dem!Benzin!4%!und!danach!2,5%!Öl!beigemischt.!! Vergaser!! Mit!der!seitlich!angebrachten!Ballpumpe!muss!das!Benzin#...
Open the catalog to page 11
! Vorflugkontrolle!! Vor!jedem!Start!sind!folgende!Überprüfungen!unbedingt! durchzuführen!!! • • • • • • • • • • • • • Käfig!am!Rahmen!richtig!montiert!und!das!Netz! gespannt!und!gesichert! Käfig!und!Netz!auf!eventuelle!Beschädigungen! überprüft! Propeller!auf!Beschädigungen!und!das!Spiel!der! Propellernabe!überprüft! Propellerschrauben!auf!festen!Sitz!!geprüft! Funktionstest!des!Stoppschalter!am!Gasgriff! durchgeführt! Benzin!mit!min.!98!Oktan!und!2T!Öl!im!richtigen! Verhältnis!im!Tank! Benzinanlage!auf!Undichtigkeit!geprüft! Sicherstellen,!dass!der!mitgelieferte!Belüftungs# Tankdeckel!montiert!ist!...
Open the catalog to page 12All Simplify-ppg GmbH catalogs and technical brochures
 X -SERIE -RAHMEN
9 Pages
 Handbuch_X3_17.12.14-englisch
19 Pages
 Carburator-and-Air_box
5 Pages
 Handbuch_X1_17.12.14-englisch
20 Pages
- Aircraft propeller
- Tractor aircraft propeller
- Single place free flight harness
- Light aircraft aircraft propeller
- 2 teeth aircraft propeller
- Single-seat paramotor
- Piston engine paramotor
- ULM aircraft propeller
- Paramotor wing
- Single place paramotor wing
- Sport paramotor wing
- Paratrike
- Paramotor trolley with engine
- Performance paramotor wing
- Single-seat paramotor trolley
- 50 - 55in aircraft propeller
- Intermediate paramotor wing
- 45 - 50in aircraft propeller
- Aluminum paramotor trolley