- Catalogs
- Signalight
- POLARIS WEB CONTROL
POLARIS WEB CONTROL

POLARIS WEB CONTROL
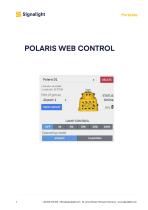
POLARIS WEB CONTROL is a web-based interface for managing airfield lighting systems. It requires no installation and is accessible via any modern web browser, relying on a functional hardware setup and local network infrastructure.
Access the system through a designated URL, overriding any security warnings. Ensure the hardware and network setup is complete, and the server is accessible through an open port for internet access.
On first use, update the application password for security, optionally change the logo, and provide a Google Maps API Key. Sign out and log back in to apply changes.
Log in with default credentials from the setup documentation. If issues arise, follow reset steps. Complete initial setup tasks after logging in.
The main view uses Google Maps to display real-time system and hardware status, allowing device selection and control. It includes a navigation bar, status bar, notification area, and device details pane.
Devices can be unregistered if unavailable or damaged. Notifications indicate device warnings or errors, and status displays current device conditions. Battery levels and lamp controls are monitored, with group control options available.
Lists active notifications with options for deletion, timestamps, device links, and messages. Notifications are categorized by severity, affecting the system status display.
Displays overall system status and notifications, with filtering options. Indicates active system mode (Eco or Performance) and provides global commands for all devices.
Includes auto time control for dimming levels, event management, light sensor control, and battery level control. System mode can be set to 'Eco' or 'Performance', affecting device operation.
Manage device groups for efficient communication, including creating, deleting, and moving devices. Special groups like '[Disabled devices]' hide devices temporarily.
Supports multiple instances with real-time synchronization. Avoid simultaneous changes to prevent conflicts.
Allow time for system status updates and avoid rapid command sequences to prevent network flooding.
Critical errors prompt application reloads. Persistent issues should be checked in the System Notifications Area or browser console.
Catalog excerpts
+40 254 515 465 [email protected] 36 Lunca Street, Petrosani, Romania www.signalight.com
Open the catalog to page 1
POLARIS WEB CONTROL is a lightweight, fully-featured, quick and easy to use web interface for controlling and monitoring hardware activity of an entire air䀁eld (or other medium to high range spatial distribution facility) lighting system. It requires no installation or special system requirements, and only needs a modern web browser to provide full capabilities, on any desktop, laptop, tablet or mobile device. It relies on a fully functional hardware setup provided by the lighting system manufacturer (please consult hardware and network setup documentation), and the local network infrastructure...
Open the catalog to page 2
User login Once you are done with any possible initial security warnings, ou will be automatically directed to the login page, as the entire application is protected by user / password authentication. Please enter the default POLARIS WEB CONTROL username and password, as provided in the hardware and network setup documentation. If for some reason your credentials are not accepted, follow the steps in the hardware and network setup documentation to reset your password Once you have successfully logged in, you will be automatically directed to the main POLARIS WEB CONTROL application page. Unless...
Open the catalog to page 3
Finally, and most important, you must provide a valid Google Maps API Key in order for your application to become fully functional. The main display of the hardware layout in the 䀁eld, as well as the main way to access each individual hardware unit for monitoring and control, is through the Google Maps main section of the main (MAP) view. If you do not own a Google Maps API Key, please follow the steps in Google's ofݴcial documentation for obtaining an API Key: Get an API Key. Once you have your API Key, please paste it in the Google Maps API Key ݴeld, and click "Save". You should now be ready...
Open the catalog to page 4
The main (MAP) view holds all the relevant information of the real-time overall system and individual hardware status, as well as the controls to access and control the system, device groups, and individual hardware units. The major parts of the user interface and controls are outlined and described below. 1. Main Application Navigation Bar Allows navigation between the Main (Map) View of the application, and other secondary sections, like SETTINGS, HELP, ABOUT, and functionality like SIGN OUT; always visible, holds the application logo. Application always loads and starts in Main (MAP) View,...
Open the catalog to page 5
5. Application Map Area This is the main view of the application, containing a Google Maps control, on which all the hardware devices (a) are placed according to their real-time reported location from their GPS sensors. The currently selected device has and additional Info Popup open (b), presenting all its reported 䀁eld data, besides being shown in the Details Pane. All the hardware devices registered with the system are initially visible on the map, all usual maps operations like zooming, panning, etc. plus additional device groups ݴltering, device error highlighting, etc. are available and...
Open the catalog to page 6
When a device is selected on the map, all its technical, logical and operational details are displayed in the Details pane adjacent to the Map Area. All further monitoring and operational tasks are performed from that device detail view. The Map Area only provides an overall system view, some 䀁eld information, and the main access point to select individual devices / groups for further tasks. Device markers on the map, besides signaling the lamp type by their graphic, also signal the current hardware status: - a device functioning normally, part of a valid group, will be just a steady graphical...
Open the catalog to page 7
3. Selected device parent group. Each device should be part of a logical group of devices. All devices that are not assigned to a group, are automatically assigned to the (no group) entity which holds all ungrouped devices. This displays the current device group, and also allows selecting another group from the drop-down list of groups de䀁ned in the system. When selecting another group, the selected device is automatically changed to the first device in the newly selected group. 4. "View Group" / "View All" button. This button allows ݴltering the system devices for easier view and analysis per...
Open the catalog to page 8
9. Battery Level status. This displays the current battery level in percentage, as reported by the hardware device in the 䀁eld. The battery level text also signals the low / warning / normal level. When the level is above the level set in System Settings for Eco Mode, the text is green. When the level is below that, but above the level set in System Settings for Low Battery, the text is yellow. When the level is below that, it is red. 10. Lamp Control operational status and controls. This area both displays the current operational status of the selected device (ON / OFF), its dimming level (1%...
Open the catalog to page 9
12. Group Control 䀁ashing frequency status / slider. This controls the ashing frequency of the ashing devices in the current group, and displays the currently set ashing frequency for the selected group. This control only exists at the group level because the group is responsible for synchronizing all the members ashing on the same clock. If oyu need to set ashing frequency on an individual device, you need to place it in a group of its own, then set the desired ashing frequency on that group. Several examples of possible hardware devices and logical groups states and modes below: FLOODLIGHT...
Open the catalog to page 10
Each noti䀁cation is made up of up to 4 components: 1. The individual delete / close control. Clicking on this will request the system to permanently remove the notiݴcation from the system. If successful, the notiݴcation will be cleared from the system and the Notiݴcations Area. It is recommended that you only clear unimportant notiݴcations, or important notiݴcations only after you've fixed the root cause that triggered them. 2. Notiݴcation date/time / timestamp. The system recorded timestamp when the notiݴcation event has happened. Notiݴcations Area lists notiݴcations in order from the newest...
Open the catalog to page 11All Signalight catalogs and technical brochures
 Runway Guard Light
6 Pages
 Low Profile
3 Pages
 Frangible Bracket
3 Pages
 GPI
GPI7 Pages
 Clinometer
13 Pages
 FLOODLIGHT 20W
8 Pages
 FLOODLIGHT 60 W
8 Pages
 Flat-ALIGNMENT-FD
8 Pages
 Coupling Tube
3 Pages
 Base Plate
3 Pages
 Surface Mounted Base
3 Pages
 Mounting Flange
3 Pages
 Standard Shallow Base
3 Pages
 Electrical Junction Box
3 Pages
 Frangible-Coupling
3 Pages
 Vista-Threshold-End-
9 Pages
 SOLAR POWER SYSTEM
7 Pages
 Obstruction Light Controller
7 Pages
 PULSAR
9 Pages
 BEACON
8 Pages
 WAGGY
WAGGY6 Pages
 Vista Taxiway
9 Pages
 Heliport Controller V3
7 Pages
 Console Controller
5 Pages
 Obstruction lighting systems
6 Pages
 Heliport Lighting Systems
8 Pages
 Airport lighting systems
8 Pages
 Wind Direction Indicator
7 Pages
 Portable Lighting Polaris
8 Pages
 Guidance Sign
7 Pages
 AL 104-04-GR/RE
9 Pages


- Color light
- Airport lighting system
- Runway beacon
- Configuration light
- Aircraft lighting system
- Obstruction beacon
- Approach beacon
- Helideck lighting system
- Landing beacon
- Position beacon
- Power supply
- IR lighting system
- Mounting lighting
- Taxiway light
- Airport lamp
- Windsock
- AC/DC power supply
- Airport sign
- Airport floodlight
- Windsock with mast