V2500 BLEED VALVE TESTER P/N TEE90

V2500 BLEED VALVE TESTER P/N TEE90
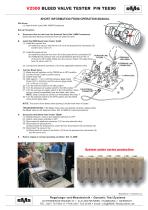
This document provides a set-up procedure and troubleshooting guide for the V2500 Bleed Valve Tester, part number TEE90, manufactured by Regelungs- und Messtechnik Dynamic Test Systems.
Set-up Procedure
- Disconnect the air tube from the solenoid valve as per AMM procedures.
- Install the RMS Bleed Valve Tester TEE90.
- Test the bleed valve.
Testing Procedure
- Ensure all switches on the TEE90 are in the OFF position.
- Connect the power cable to a power source and switch the tester ON.
- Wait approximately 1 minute until the pressure gauge reads 30 psi (2.07 ± 0.05 bar) and the vacuum gauge reads 7.25 psi (± 0.05 bar).
- Turn the solenoid switch to the ON position.
- Turn the pressure air supply switch to the ON position.
- Turn the vacuum air supply switch to the ON position and listen for the bleed valve to close.
- Immediately after, turn the solenoid switch to the OFF position; the bleed valve should open with a louder sound than when it closes.
Troubleshooting
If the bleed valve does not operate correctly, replace either the bleed valve or the solenoid valve, referring to AMM for correct procedures.
Disconnection Procedure
- Switch pressure, vacuum, and solenoid switches to OFF.
- Switch main power switches to OFF.
- Disconnect the electrical connector from the solenoid valve.
- Disconnect the pressure line union from the pressure line connection.
- Disconnect the vacuum line fixture from the pressure line connection and the servo vent.
Conclusion
Ensure the engine is returned to normal operating condition as per AMM procedures after testing.
Catalog excerpts
V2500 BLEED VALVE TESTER P/N TEE90 SHORT INFORMATION FROM OPERATION MANUAL Get Acces (1) Open the fan cowls (Ref. AMM Procedures) Set-up Procedure A. Disconnect the air tube from the Solenoid Valve (Ref. AMM Procedures) Disconnect the electrical connector from the solenoid valve Install the RMS Bleed Valve Tester Tee90 (1) Install the vacuum line (a) Install the vacuum line fixture (10) on to the pressure line connection (8) and the servo vent (11) (2) Install the pressure line (a) Install the pressure line union (9) to the pressure line connection (8) (b) TORQUE the pressure line uinion (9) between 204 and 221 lbf. in (2.30 and 2.49 m.daN): Make sure the vacuum fixture (10) seals down over the servo vent (11). (3) Connect the electrical connector (12) to the applicable solenoid valve. Test the Bleed Valve (1) Make sure all switches on the TEE90 are in OFF position (2) Connect Power Cable to power source (3) Switch tester ON (4) Wait (approx. 1 min.) until the pressure gage reads 30 psi (2.07 ± 0.05 bar) and the vacuum gage reads 0.5 ± 0.05 bar (7.25 psi) (5) Turn the solinoid switch to the ON position (6) Turn the pressure air supply switch to the ON position (7) Turn the vacuum air supply switch to the ON position, listen, and you should immediately hear the bleed valve close. NOTE: Step 8 should be carried out immediately after step 7! (8) Turn the solinoid switch to the OFF position and the bleed valve should bang open. NOTE: The sound of the bleed valve opening is louder than when it closes ! TROUBLESHOOTING: If the Bleed Valve does not operate correctly, replace either the Bleed Valve or the Solenoid Valve. Ref. to AMM for correct procedures. Disconnect the Bleed Valve Tester TEE90 (1) Switch pressure, vacuum and solenoid switches to OFF (2) Switch main power switches to OFF (3) Disconnect the electrical connector (12) from the solenoid valve (4) Disconnect the pressure line (a) Disconnect the pressure line union (9) from the pressure line connection (8) (5) Disconnect the vacuum line (a) Disconnect the vacuum line fixture (10) from the pressure line connection (8) and the servo vent. Return engine to normal operating condition. Ref. to AMM System under series production Dynamic Test Systems
Open the catalog to page 1All RMS catalogs and technical brochures
 FER 102/202
4 Pages
 P/N IP 50
8 Pages
 TR 31/2
2 Pages
 SM 105
8 Pages
 TEE62-2
8 Pages
 PMC-TESTER TEE61
2 Pages


- Test bench
- Aeronautical test bench
- Aeronautical testing machine
- Testing machine
- Material testing machine
- Testing machine for the aerospace industry
- Motor test bench
- Automatic testing machine
- Vertical testing machine
- Vibration testing machine
- Temperature test bench
- Pressure testing machine
- Fatigue testing machine
- Motor testing machine
- Horizontal testing machine
- Electric testing machine
- Pneumatic testing machine
- Noise testing machine
- Generator testing machine