
Catalog excerpts

User’s Manual Thanks for reading before first use. Opale-Paramodels.com Opale Aero System SARL - 23 rue de la Motte 62250 MARQUISE - France contact@opale-paramodels.com +33(0)981 144 387
Open the catalog to page 1
Safety Information You should be properly insured according to the country regulation you are using our equipment in. You hereby accept the inherent risk of flying radio-controlled models. Using our equipment in a bad way may increase risks. Neither Opale-Paramodels nor any other seller will be liable for any damage caused by any accident whatever the circumstances are. The way our equipment is used is incumbent upon the final user, including towards the law. Thanks for having chosen an Opale-Parmodels product. We truly believe this remote-controlled paraglider is going to give you hours of...
Open the catalog to page 2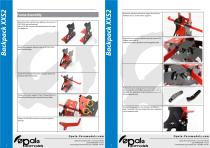
Frame Assembly Mount the side and the lower platinum by mean of 2 CHC M3-8 and nutlockings. Use a CHC M3-8 screw and nutlockings for the superior platinum. Mount the opposite side by mean of 3x CHC M3-8 and 3x nutlockings. Mount the superior shrouds by mean of 4x M3 nutlockings (incl. 2 on the motor support). Mount the servomotor (without arm) by mean of 2X Phillips screws M2*8. Perform the same operation on the opposite side. Insert the horizontal shroud by sliding it above the location of the servomotor. Perform the arm mounting on the servomotor’s arm by mean of the two Phillips screws...
Open the catalog to page 3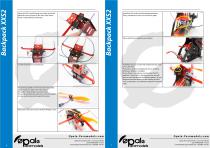
Insert the PVC strand through one of the two holes planned at this purpose on the rear of the frame. Insert it centimeter by centimeter. Install the ESC under the intermediate platinum. Then, put adhesive velcro on the inferior plate. Velcro will let you solidly fix your battery. Install the spacers on each side of the frame by mean of 2x CHC M3-8. The spacers position will depend of your centring while your battery is installed. If your frame is nosedown, you must use the first position. If your frame is strongly nose up, you will have to move backwards the fixation spacers. Do not forget...
Open the catalog to page 4
Remote Control Mounting Hold on the remote control and its receiver. Connect the mixer on the receiver by respecting affectations on the axes “Aileron/Depth”. Please refer to the Remote Control manual. Connect the servomotors on the mixer. Please refer to the mixer video tutorial for connecting and using. https://youtu.be/P2njCNCTudU Dispose antenna(s) on the receiver on the superior shrouds of the frame. This position allow to obtain a good reception for the radio signal. Oxy 0.5 Wing Mounting Dispose the wing flat. Seize one of the risers. Remove the knot performed on the brake line on...
Open the catalog to page 5
My RC paramotor seems not to move forward very fast. How to remedy this problem?’ If your model advance a little bit, or if it even stays on-the-spot, it is because your model is too light. In that case, you have to land and increase the weight with additional ballast or batteries until you obtain a 5 to 10 km/h with regard to the ground. How do I know if the brakes bridle are adjusted correctly? Brakes bridle are perfectly adjusted when the trailing edge is completely loose while flying, with the depth stick pushed up. Also, as soon as you push laterally of some millimiters the aileron...
Open the catalog to page 6All OPALE PARAMODELS catalogs and technical brochures
-
 Rage 1.0 / Backpack XS3
21 Pages
-
 Camo H2.6
11 Pages
-
 Split 1.6
12 Pages
