- Catalogs
- Meyer Hydraulics Corporation
- SEAL INSTALLATION

SEAL INSTALLATION
SEAL INSTALLATION
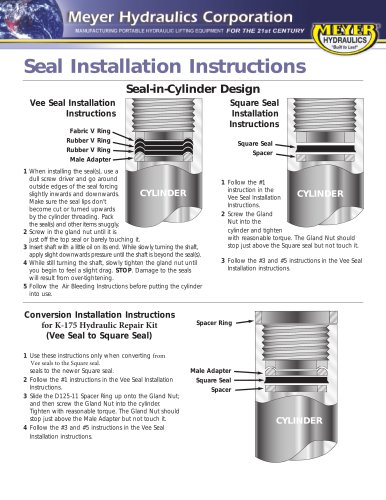
- Use a dull screwdriver to install seals, ensuring seal lips are not damaged by cylinder threading. Pack seals snugly.
- Screw in the gland nut until it barely touches the top seal.
- Insert the shaft with oil, applying slight downward pressure while turning until it passes the seals.
- Tighten the gland nut until slight drag is felt, avoiding over-tightening to prevent seal damage.
- Follow air bleeding instructions before using the cylinder.
- Follow the initial seal installation step.
- Screw the gland nut into the cylinder with reasonable torque, stopping just above the square seal.
- Follow steps 3 and 5 from the seal installation instructions.
- Use these instructions for converting from Vee seals to Square seals.
- Follow the initial seal installation step.
- Slide the D125-11 Spacer Ring onto the gland nut, then screw it into the cylinder, stopping above the male adapter.
- Follow steps 3 and 5 from the seal installation instructions.
- Apply hydraulic jack oil to all items after installation.
- Insert the piston and seals into the cylinder, ensuring seal lips do not curl upwards.
- If seals snag, use a dull screwdriver to adjust seal lips inward.
- Push the piston fully into the cylinder and secure with the cylinder cap.
Catalog excerpts
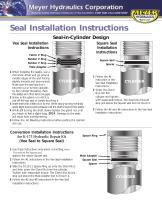
Seal-in-Cylinder Design Square Seal Vee Seal Installation Instructions Fabric V Ring Rubber V Ring Rubber V Ring Male Adapter 1 When installing the seal(s), use a dull screw driver and go around outside edges of the seal forcing slightly inwards and downwards. Make sure the seal lips don't become cut or turned upwards by the cylinder threading. Pack the seal(s) and other items snuggly. 2 Screw in the gland nut until it is just off the top seal or barely touching it. 3 Insert shaft with a little oil on its end. While slowly turning the shaft, apply slight downwards pressure until the shaft is beyond the seal(s). 4 While still turning the shaft, slowly tighten the gland nut until you begin to feel a slight drag. STOP. Damage to the seals will result from over-tightening. 5 Follow the Air Bleeding Instructions before putting the cylinder into use. Square Seal Spacer 1 Follow the #1 instruction in the Vee Seal Installation Instructions. 2 Screw the Gland Nut into the cylinder and tighten with reasonable torque. The Gland Nut should stop just above the Square seal but not touch it. 3 Follow the #3 and #5 instructions in the Vee Seal Installation instructions. Conversion Installation Instructions for K-175 Hydraulic Repair Kit (Vee Seal to Square Seal) 1 Use these instructions only when converting from Vee seals to the Square seal. seals to the newer Square seal. 2 Follow the #1 instructions in the Vee Seal Installation Instructions. 3 Slide the D125-11 Spacer Ring up onto the Gland Nut; and then screw the Gland Nut into the cylinder. Tighten with reasonable torque. The Gland Nut should stop just above the Male Adapter but not touch it. 4 Follow the #3 and #5 instructions in the Vee Seal Installation instructions.
Open the catalog to page 1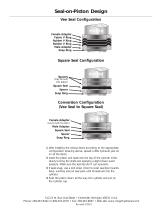
Female Adapter Fabric V Ring Rubber V Ring Rubber V Ring Male Adapter Snap Ring Spacers (may be built into piston) Square Seal Spacer Snap Ring Female Adapter (may be built into piston) Male Adaptor Square Seal Spacer Snap Ring 1 After installing the various items according to the appropriate configuration drawing above, spread a little hydraulic jack oil on all the items. 2 Insert the piston and seals into the top of the cylinder while slowly turning the shaft and applying a slight down-ward pressure. Make sure the seal lips don't curl upwards. 3 If seals snag, use a dull screw driver to push...
Open the catalog to page 2