- Products
- Catalogs
- News & Trends
- Exhibitions
VIRB

VIRB
This manual provides guidance for the Garmin VIRB™ Series, emphasizing safe usage and installation to prevent damage or injury.
The device supports a microSD™ card up to 64GB, class 10 or better. Installation involves removing the battery cover and inserting the card with gold contacts facing down.
The device uses a lithium-ion battery, chargeable via wall outlet or USB. LED colors indicate charging status. Avoid extreme heat exposure.
Features include navigation keys and a REC switch for video recording. Mounting options vary, with specific conditions for adhesive use.
Modes include VIEWFINDER, PLAYBACK, DASHBOARD, and SETUP. The viewfinder assists in shot setup, with additional features for the VIRB Elite model.
Initiated by the REC switch, videos are saved as MP4 files. Settings include resolution, field of view, and loop recording.
Options for taking photos include delayed and repeated shots, with various resolution and mode settings.
Photos and videos can be viewed on the device or via HDMI. Supports headphone connectivity and composite video output.
Records track log data and displays sensor data, with ANT+ sensor pairing options.
Remote control is possible, including for multiple devices. Troubleshooting covers power and video quality issues.
Includes system settings, memory management, battery life tips, and care instructions. Specifications and support details are provided.
The microphone can be enabled unless an external microphone is connected. Wind noise can be reduced by disabling the microphone.
Various modes offer specific resolutions and frame rates, including 1080p, Tall HD, Fast HD, Economy HD, Slow Mo HD, Super Slow Mo, and Time Lapse.
Includes Lens Correct, Stabilize, and Flip Camera options. Automatic recording is available for the VIRB Elite.
Requires a Garmin accessory cable for external microphone use.
Includes resolution, shooting mode, self-timer, and date stamp options.
Photos and videos can be viewed on the device or via HDMI.
Headphones can be connected for audio monitoring, with adjustable volume.
Requires additional cables for external display playback.
Available for VIRB Elite, tracks record GPS data and dashboards display sensor data.
Allows pairing with compatible sensors for track logs and dashboard data.
To pair a new sensor, forget existing ones via MODE > SETUP > SENSORS > Forget All.
Control the device using compatible Garmin devices with ANT+ technology.
For VIRB Elite, control via the Garmin VIRB app using Wi-Fi.
Change wireless settings via MODE > SETUP > WIFI > Advanced.
Solutions for common issues include checking battery installation and using a class 10 microSD card.
Access via MODE > SETUP > SYSTEM for various options.
Erase data via MODE > SETUP > CARD > Erase > OK.
Disable Wi-Fi, enable power save, and use REC for power management.
Avoid chemical cleaners and extreme temperatures. The device is water-resistant to IPX7 standards.
Supports .gpx, .jpeg, .mp4, and .fit files. Connect to a computer using a USB cable.
The Garmin VIRB application offers video editing, track log review, and software updates.
Includes a rechargeable Lithium-ion battery, water resistance to IPX7, and operating temperatures from -15º to 60ºC.
Catalog excerpts
Owner’s Manual
Open the catalog to page 1
All rights reserved. Under the copyright laws, this manual may not be copied, in whole or in part, without the written consent of Garmin. Garmin reserves the right to change or improve its products and to make changes in the content of this manual without obligation to notify any person or organization of such changes or improvements. Go to www.garmin.com for current updates and supplemental information concerning the use of this product. Garmin® and the Garmin logo are trademarks of Garmin Ltd. or its subsidiaries, registered in the USA and other countries. ANT™, ANT+™, BaseCamp™, fēnix™,...
Open the catalog to page 2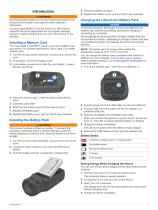
Introduction WARNING See the Important Safety and Product Information guide in the product box for product warnings and other important information. It is your responsibility to use the device in a safe manner. Garmin® will not be responsible for any property damage, injuries or deaths resulting from any use of this device in any activities. Installing a Memory Card You must install a microSD™ memory card up to 64GB to use your device. For optimal performance, use a class 10 or better memory card. 1 Turn the D-ring counter-clockwise, and pull up to remove the cover. 2 If necessary, remove...
Open the catalog to page 5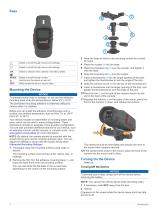
3 Allow the base to bond to the mounting surface for at least Select to scroll through menus and settings. Select to scroll through menus and settings. OK Select to choose menu options or to take a photo. Select to scroll through modes. Hold to turn the device on and off. Slide toward the lens to record video. Mounting the Device NOTICE To prevent product loss or damage, do not use the adhesive mounting base when the temperature is below 5°F (-15°C). The permanent mounting adhesive is extremely difficult to remove after it is installed. Before you can install the adhesive mounting base...
Open the catalog to page 6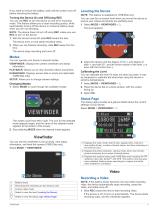
If you need to remove the battery, wait until the screen turns off before removing the battery. Turning the Device On and Off Using REC You can use REC to turn the device on and off in recording mode. This feature allows you to start recording quickly, while automatically turning off the device to conserve battery power when you are not recording. NOTE: The device does not turn off using REC unless you use REC to turn on the device. 1 With the device turned off, slide REC toward the lens. The device turns on and starts recording video. 2 When you are finished recording, slide REC away from...
Open the catalog to page 7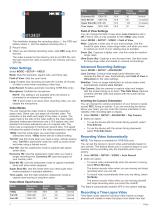
Resolution (pixels) Aspect Ratio Time Lapse Field of View Settings The viewfinder displays the recording status À, the GPS and battery status Á, and the elapsed recording time Â. 2 Record video. 3 When you are finished recording video, slide REC away from the lens. The video is saved on the memory card as an MP4 file, and the track log for the video is saved on the memory card as a GPX file. Advanced Recording Settings Video Settings Select MODE > SETUP > VIDEO. Mode: Sets the resolution, aspect ratio, and frame rate. Field of View: Sets the zoom level. Loop: Enables loop recording and...
Open the catalog to page 8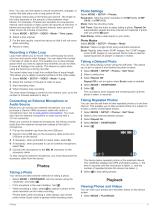
time. You can use time lapse to record movements, changes, or events that take place over a long period of time. Time-lapse videos play at 30 frames per second. The length of the video depends on the amount of time between video frames. For example, if frames are recorded at a one-second interval, each second of video covers 30 seconds of real time. If frames are recorded at a 60-second interval, each second of video covers 30 minutes of real time. 1 Select MODE > SETUP > VIDEO > Mode > Time Lapse. 2 Select a time interval. 3 For the best results, mount the device so that it will not...
Open the catalog to page 9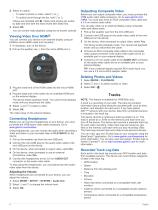
2 Select an option: • To select a photo or video, select or . • To quickly scroll through the list, hold or . Videos are indicated with . Videos and photos are sorted by date and time with the most recent item listed first. 3 Select OK. You can control video playback using the on-screen controls. Viewing Video Over HDMI® You can connect your device to an external display using an HDMI-to-micro-HDMI cable (not included). 1 If necessary, turn on the device. 2 Pull up the weather cap À from the micro-HDMI port Á. Outputting Composite Video Before you can output composite video, you must...
Open the catalog to page 10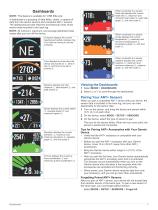
Dashboards NOTE: This feature is available for VIRB Elite only. A dashboard is a grouping of data fields, charts, or graphs of data from the device sensors and connected ANT+ sensors. The dashboards provide real-time and historical views of the sensor data recorded to the track log. NOTE: All minimum, maximum, and average dashboard data resets after you turn off the device. Compass displays the current heading and partial compass ring. You must be moving to use the compass. Time displays the time since the device was turned on À, time of day Á, and time of sunset or sunrise Â. Distance...
Open the catalog to page 11
Remote Control You can start recording, stop recording, and take pictures on your VIRB device using another compatible Garmin device with ANT+ wireless technology, such as the VIRB remote control accessory or the fēnix™ watch. You can also use your VIRB device to control other VIRB devices. Advanced Wireless Settings You can change the wireless host settings for your device. Select MODE > SETUP > WIFI > Advanced. SSID: Sets the SSID, which identifies your VIRB device on other devices. Password: Sets the password used to connect to your VIRB device. Controlling the Device Remotely 1 On...
Open the catalog to page 12
Record Light: Turns the recording light on or off. Tones: Turns audible tones on or off. Power Save: Turns off the device automatically when the device has not been used for five minutes. Time/Date: Sets the time and date formats. Units: Sets the units of measure. Language: Sets the on-screen text language. Reset Settings: Restores the default device settings. About: Displays important software information and your unit ID. Time and Date Settings Select MODE > SETUP > SYSTEM > Time/Date. Time: Sets the time. NOTE: VIRB Elite devices set the time automatically when you enable GPS. Time...
Open the catalog to page 13Archived catalogs
 aera
aera6 Pages
 aera 795/796
70 Pages
 G500H
G500H92 Pages
 GPSMAP695/696
280 Pages