LUNA

LUNA
Thank you for purchasing the Fly Products Tundra Tire Kit. These durable tires are designed for challenging terrains such as sand, snow, mud, and rocky surfaces, enhancing your launching and landing capabilities without compromising performance. This guide provides a step-by-step process for mounting the new tires efficiently and safely, requiring minimal tools and approximately 30 minutes for setup.
Kit Contents
- 1 front Tundra tire with preinstalled disk
- 2 rear Tundra tires (Pressure range: 5-15 PSI)
- Hardware Set for Front Wheel Brake Support Extension
- Hardware Set for Rear Wheel Mounting
- 1 set of extension webbing for cage lines
Front Tire Replacement
- Remove the two front axle bolts and four carbon fibre mud guard bolts.
- Detach the brake mechanism by unscrewing the two fixing bolts from the orange frame support.
- Remove the standard tire.
- Insert the Tundra tire using the original axle bolts and attach the aluminium brake support extensions with the longer bolts supplied, ensuring correct brake mechanism displacement.
- Tighten bolts to 25Nm. Note: Do not use Loctite on the front wheel bolts.
Rear Tire Replacement
- Remove the carbon fiber mud guard and its aluminium support bracket.
- Remove the axle bolt and precision nylon lock nut using the specified socket tool.
- Replace the standard tire with the Tundra tire.
- Insert the aluminum spacer.
- Fix and tighten the tire using the supplied 8x20mm longer axle bolt. Torque to 25Nm. Apply a small drop of Medium Loctite 243 Blue Medium strength to the bolt thread before tightening.
- Attach the bungee guard extension webbing to the main strut using the bolt and nylon nut from the mud guard bracket.
Important Notes
- Always double-check torque after the first flight.
- After installation, mark the position of the bolts with an enamel marker for future reference.
Contact Information
For more information, visit www.flyproducts.com or www.lunatrike.com. Contact Fly Products s.r.l. at Via Perù 30, 63013 Grottammare (AP), Italy, Tel/Fax: +39.735.632486.
Catalog excerpts

Assembly guide for the Fly Products Luna Congratulations and thank you for purchasing the Fly Products Tundra Tire Kit. These tough tires will bring you years of service on difficult terrain. Whether on sand, snow, mud or rocky surfaces you’ll discover your launching and landing options have just expanded! The larger size will also bring you added suspension without any performance penalty. We’ve created this simple step-by-step guide to mount your new tires as quickly and safely. The tool set you need is minimal and the estimated time for set up is approximately 30 minutes. For information, more details and news see our internet sites: www.flyproducts.com www.lunatrike.com © Copyright by FLY PRODUCTS s.r.l. Via Perù 30 63013 GROTTAMMARE (AP) - ITALY tel./fax +39.735.632486
Open the catalog to page 1
This kit contains the following: • • • • • 1 front Tundra tire with disk preinstalled. 2 rear Tundra tires. Pressure range 5-15 PSI Hardware Set for Front Wheel Brake Support Extension Hardware Set for Rear Wheel Mounting 1 set of extension webbing for cage lines Step1-Replacing the FRONT standard tire with the tundra tire. A. Remove the two front axle bolts and four carbon fibre mud guard bolts B. Remove brake mechanism by unscrewing the two fixing bolts from the orange frame support. C. Remove the standard tire. D. Insert the Tundra tire, using original axle bolts, and attach the aluminium...
Open the catalog to page 2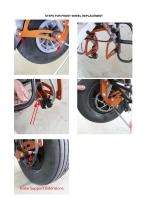
STEPS FOR FRONT WHEEL REPLACEMENT
Open the catalog to page 3
STEPS FOR REAR WHEEL REPLACEMENT
Open the catalog to page 4All FLY PRODUCTS catalogs and technical brochures
 Flash Cruiser
23 Pages
 VERTIGO
13 Pages
 Xenit Thor 250
21 Pages
 ECO 2 LIGHT
24 Pages
- Single place free flight harness
- Paragliding free flight harness
- Paramotor
- Single-seat paramotor
- Piston engine paramotor
- Light free flight harness
- Seated position free flight harness
- Altimeter
- Aircraft altimeter
- Paratrike
- Helmet with chin rest
- Paramotor trolley with engine
- Single-seat paramotor trolley
- Feet altimeter
- Free flight helmet
- Two-seater paramotor trolley
- Aluminum paramotor trolley
- Electric paramotor
- Connection technology helmet
- Digital altimeter