- Catalogs
- FLY PRODUCTS
- ECO 2 LIGHT
ECO 2 LIGHT

ECO 2 LIGHT
This document serves as the assembly manual for the ECO 2 Light, version 2.06, by FLY Products s.r.l. It outlines detailed instructions for assembling the product, highlighting the necessity of having at least two people for the assembly process.
1. Cradle Assembly
Start by placing the rear part on a 30 cm high support and elevate the motor base vertically. Align the cradle with the bolt holes and secure the bolts on both the upper and lower sides.
2. Legs Assembly
Position the leg and insert the bolt without initially locking it, beginning with the front support. Repeat for the rear support. Once positioned, lock the upper bolt and the two lower bolts, and repeat for the other leg. Adjust the third support to center the clutch on the frame.
3. Connections
Avoid overtightening bolts to prevent tube damage. The cradle includes an internal security cable that must be attached to the engine support frame on both sides. Wrap the safety wire around the frame tube, hook it onto itself, and secure the hook.
4. Harness and Safety Features
The emergency belt is pre-wired on the motor support. Attach the ends to the karabiners and secure them with elastic Velcro. For manual emergencies, fasten the belt with Velcro strips and clamps. Connect the electrical plug and follow the designated paths for emergency belts.
5. Cage Assembly
Assemble the three support arms of the rear cage, ensuring the shorter arm is on top. Lock the arms with safety Velcro, ensuring pins are inserted into appropriate holes. Position the elastic safety hook and Velcro hook to engage the kill switch device.
6. Propeller Assembly
Correctly position the propeller blades for assembly, interlock them, and secure with the pre-prepared flange. Tighten bolts alternately with a force of about 2.4 kg. A spacer is required only for the "RMZ 500" type engine.
7. Final Steps
Mount the propeller covers starting with the one with the belt on the tip, then position the blade vertically. Secure the belt around the frame and close it on its buckle.
Assembly Instructions
Secure the two additional covers to the already mounted vertical cover to prevent detachment.
Assisted Wing Inflation at Takeoff
Instructions for setting up assisted wing inflation during takeoff are provided.
Wing Hook Settings
Tandem Configuration: Guidelines for wing hook settings when configured for tandem flights.
Mono Configuration: Guidelines for wing hook settings when configured for solo flights.
Important Note
It is emphasized that the pilot's engagement position should never be altered.
Catalog excerpts

Assembly Manual V 2.06 © Copyright by FLY Products s.r.l. Via Perù n. 30 - 63066 GROTTAMMARE (AP) - ITALY tel./fax +39.735.632486 www.flyproducts.com - * [email protected]
Open the catalog to page 1
ECO 2 LIGHT ASSEMBLY MANUAL ASSEMBLY MANUAL
Open the catalog to page 2
ECO 2 LIGHT ASSEMBLY MANUAL FOR THE ASSEMBLY AT LEAST TWO PEOPLE ARE NECESSARY ---------------------------- PER IL MONTAGGIO SONO NECESSARIE ALMENO DUE PERSONE Place the rear part on a support about 30 cm high and raise the motor base vertically ---------------------------- Appoggiare la parte posteriore su un supporto alto circa 30 cm e alzare la base del motore in posizione verticale Place the cradle at the bolt holes position ------------------------ Appoggiare la culla in corrispondenza dei fori per i bulloni
Open the catalog to page 3
ECO 2 LIGHT ASSEMBLY MANUAL position and lock the bolts on the upper side ------------------------ Posizionare e bloccare i bulloni del lato superiore position and lock the bolts on the lower side ------------------------ Posizionare e bloccare i bulloni del lato inferiore
Open the catalog to page 4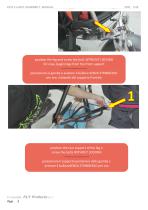
ECO 2 LIGHT ASSEMBLY MANUAL position the leg and screw the bolt, WITHOUT LOCKING for now, beginnings from the front support ------------------------ posizionare la gamba e avvitare il bullone SENZA STRINGERLO per ora, iniziando dal supporto frontale position the rear support of the leg e screw the bolts WITHOUT LOCKING ------------------------ posizionare il supporto posteriore della gamba e avvitare il bulloneSENZA STRINGERLO per ora
Open the catalog to page 5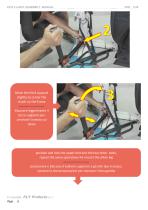
ECO 2 LIGHT ASSEMBLY MANUAL Move the third support slightly to center the clutch on the frame ------------------------ Muovere leggermente il terzo supporto per centrare l’innesto sul telaio position and lock the upper bolt and the two other bolts, repeat the same operations for mount the other leg ------------------------ posizionare e bloccare il bullone superiore e gli altri due in basso, ripetere le stesse operazioni per montare l’altra gamba
Open the catalog to page 6
ECO 2 LIGHT ASSEMBLY MANUAL DO NOT TIGHTEN STRONGLY THE BOLDS TO AVOID CRUSHING THE TUBE ----------------------------- NON STRINGERE TROPPO FORTE I DADI PER EVITARE DI SCHIACCIARE IL TUBO The cradle has an internal security cable that must be hooked to the engine support frame on both sides ------------------------ La culla ha un cavo di sicurezza interno che và agganciato al telaio del supporto motore in entrambi i lati
Open the catalog to page 7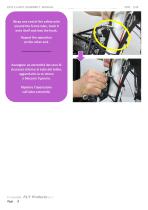
ECO 2 LIGHT ASSEMBLY MANUAL Wrap one end of the safety wire around the frame tube, hook it onto itself and lock the hook. Repeat the operation on the other end. ---------------------------- Avvolgere un estremità del cavo di sicurezza attorno al tubo del telaio, agganciarlo su se stesso e bloccare il gancio. Ripetere l’operazione sull’altra estremità.
Open the catalog to page 8
ECO 2 LIGHT ASSEMBLY MANUAL The emergency belt is already wired on the motor support, hook the two ends to the karabiners and lock them on the cradle with the apposite elastic velcroes ------------------------ La cinta dell’emergenza è gia cablata sul supporto motore, agganciare le due estremità ai moschettoni e fermarla sulla culla con gli appositi velcri elastici Plug-in the electrical connection ------------------------ Inserire lo spinotto della connessione elettrica path of the BALLISTIC emergency belt ---------------- Percorso della cinta Dell’emergenza BALISTICO if a manual emergency is...
Open the catalog to page 9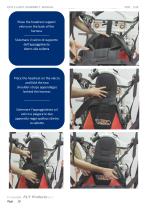
ECO 2 LIGHT ASSEMBLY MANUAL Place the headrest support velcro on the back of the harness ------------------------ Sistemare il velcro di supporto dell’appoggiatesta dietro alla selletta Place the headrest on the velcro and fold the two shoulder-straps appendages behind the harness ------------------------ Sistemare l’appoggiatesta sul velcro e piegare le due appendici reggi-spallacci dietro la selletta
Open the catalog to page 10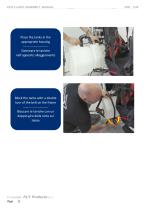
ECO 2 LIGHT ASSEMBLY MANUAL VER. 2.06 ECO 2 LIGHT ASSEMBLY MANUAL VER. 2.06 Place the tanks in the appropriate housing Sistemare le taniche nell'apposito alloggiamento Block the tanks with a double turn of the belt on the frame Bloccare le taniche con un doppio giro della cinta sul telaio L. J © Copyright FL Y Products s.r.i. Page 11
Open the catalog to page 11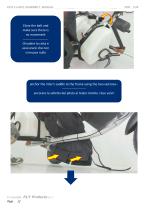
ECO 2 LIGHT ASSEMBLY MANUAL Close the belt and make sure there is no movement ------------------------ Chiudere la cinta e assicurarsi che non si muova nulla anchor the rider's saddle to the frame using the two velcroes----------------------- ancorare la selletta del pilota al telaio tramite i due velcri
Open the catalog to page 12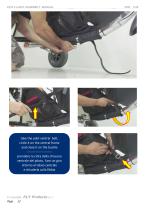
ECO 2 LIGHT ASSEMBLY MANUAL take the pilot ventral belt, circle it on the central frame and close it on the buckle ------------------------ prendere la cinta della chiusura ventrale del pilota, fare un giro attorno al telaio centrale e chiuderla sulla fibbia
Open the catalog to page 13
ECO 2 LIGHT ASSEMBLY MANUAL Position of the elastic safety hook and the velcro hook (in yellow) to engage the kill switch device (in red) ------------------------ Posizione della sicura elastica e il fermo con velcro (in giallo) per agganciare il pulsante di spegnimento (in rosso) Assemble the three support arms of the rear cage, the shorter goes up and the other two go one on the right and one on the left, being careful not to invert them ------------------------ Montare i tre bracci di supporto della gabbia posteriore, il piu corto va in alto e gli altri due vanno uno a destra e uno a sinistra...
Open the catalog to page 14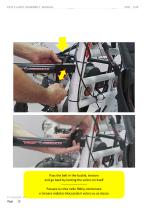
ECO 2 LIGHT ASSEMBLY MANUAL Pass the belt in the buckle, tension and go back by locking the velcro on itself ------------------------ Passare la cinta nella fibbia, tensionare e tornare indietro bloccando il velcro su se stesso FLY Products s.r.l.
Open the catalog to page 15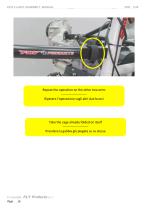
ECO 2 LIGHT ASSEMBLY MANUAL Repeat the operation on the other two arms ------------------------ Ripetere l’operazione sugli altri due bracci Prendere le 3 parte dil telaio insieme Take the cage already folded on itself ------------------------ Prendere la gabbia già piegata su se stessa
Open the catalog to page 16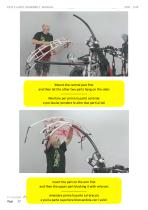
ECO 2 LIGHT ASSEMBLY MANUAL Mount the central part first and then let the other two parts hang on the sides ------------------------ Montare per prima la parte centrale e poi lasciar pendere le altre due parti ai lati insert the part on the arm first and then the upper part blocking it with velcroes ------------------------ innestare prima la parte sul braccio FLY Products s.r.l. e poi la parte superiore bloccandola con i velcri
Open the catalog to page 17All FLY PRODUCTS catalogs and technical brochures
 Flash Cruiser
23 Pages
 VERTIGO
13 Pages
 Xenit Thor 250
21 Pages
 LUNA
LUNA4 Pages
- Single place free flight harness
- Paragliding free flight harness
- Paramotor
- Single-seat paramotor
- Piston engine paramotor
- Light free flight harness
- Seated position free flight harness
- Altimeter
- Aircraft altimeter
- Paratrike
- Helmet with chin rest
- Paramotor trolley with engine
- Single-seat paramotor trolley
- Feet altimeter
- Free flight helmet
- Two-seater paramotor trolley
- Aluminum paramotor trolley
- Electric paramotor
- Connection technology helmet
- Digital altimeter