Catalog excerpts

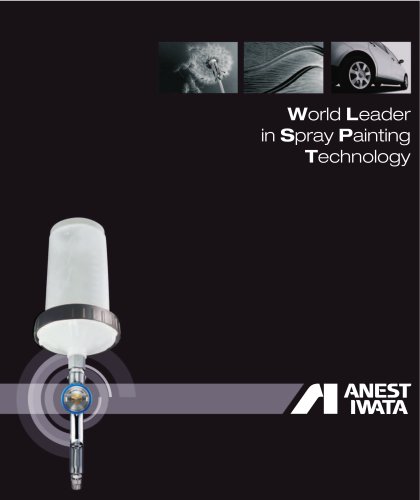
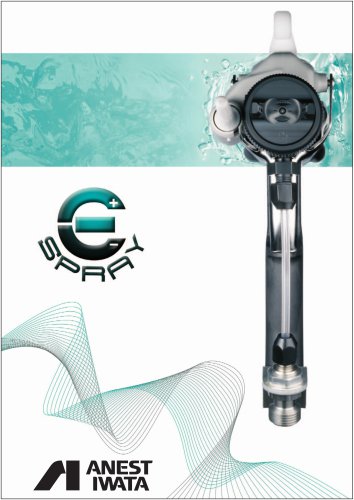
General Industry AUTOMATIC SPRAY GUN WA-M220 with manifold WA-M220 WB Water Base version WA-M220 L with manifold and small Atomizer USE & MAINTENANCE INSTRUCTION MANUAL
Open the catalog to page 1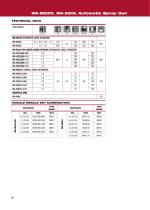
WA-M220, WA-220L Automatic Spray Gun TECHNICAL DATA WA-M220 (STANDARD SIZED ATOMIZER) WA-M220 WA-M220 WB WATER BASED VERSION (STANDARD SIZED ATOMIZER) WA-M220WB-081 WA-M220WB-101 WA-M220WB-121 WA-M220WB-141 WA-M220WB-161 WA-M220-L (SMALL SIZED ATOMIZER) WA-M220-L044 NOZZLE_NEEDLE SET COMBINATION Fluid Needle Fluid Nozzle Fluid Needle Fluid Nozzle
Open the catalog to page 2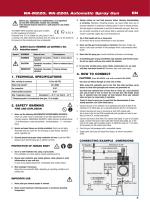
WA-M220, WA-220L Automatic Spray Gun Before use, adjustment or maintenance, it is important to read this instruction manual very carefully. This manual must be stored in a safe place for any future reference. This ANEST IWATA automatic spray guns complies to ATEX regulations 2014/34/EU. Protection level: II 2G X Suitable for using Zones 1 and 2. X marking: Any static electricity discharge from the spray gun is to be diverted to the ground via the conductive air hose as stipulated. ALWAYS observe WARNINGS and CAUTIONS in this instruction manual. Hazard level Potentially hazardous Death or...
Open the catalog to page 3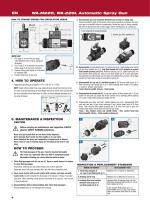
HOW TO CHANGE UNIONS FOR CIRCULATION USAGE A. Disassemble gun and manifold. Manifold can be kept on fixing stay. Cause manifold is kept on fixing stay, when spray operation continues, just connect gun to manifold without re-positioning. Hoses are kept on fixing manifold. No need to disconnect and connect again, when maintenance is carried out. 1.Turn wing bolt (9) counterclockwise 2. Remove gun from manifold (12) IMPORTANT 1. Pull plug (3-2) out from gun body, with attached screw (19) as standard accessory. 2. Put O’ring (3-3) as standard accessory, where plug (3-2) has been removed. 3....
Open the catalog to page 4
WA-M220, WA-220L Automatic Spray Gun 4. To adjust fluid needle packing set (3-4), first tighten it by hand while fluid needle set (2-2) is inserted. Then tighten it further about 1/6 turn (60-degree) by wrench. When you remove needle packing set (3-4), do not leave plastic piece of needle packing set (3-4) in the gun body. IMPORTANT: If you tighten fluid needle packing set (3-4) too much, fluid needle set (2-2) does not move smoothly, resulting in paint leakage from tip of fluid nozzle (2-1). Try to adjust it carefully while pulling and pushing fluid needle set (2-2) by hand checking its...
Open the catalog to page 5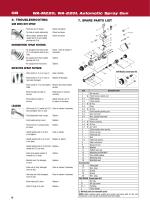
7. SPARE PARTS LIST - Fluid adj. set (7) closed. Check and adjust. - Tip hole of nozzle obstructed. Check and clean. - Paint buildup, between fluid Check and clean. needle set (2-2) and needle packing set (3-4) INTERMITTENT SPRAY PATTERN - Air escapes from fluid nozzle Check , clean & replace if (2-1) and tapered seat of gun. necessary. body. - Air escapes from fluid needle Tighten. packing set (3-4). - Air escapes from hose joint. Tighten. - Dirty nozzle (2-1) or air cap (1). Clean carefully. DEFECTIVE SPRAY PATTERN WA-M220L Conversion Kit 1 - Fluid nozzle (2-1) or air cap (1) Replace If...
Open the catalog to page 6
Per scaricare la pressione, chiudere l’alimentazione dell’aria compressa e della vernice. Quindi fornire solo l’aria al pistone e scaricare il materiale operando sull’astina. Questa azione provocherà l’arresto automatico dell’aria compressa. Prima di procedere all’installazione, alla messa in funzione, alla regolazione o alle operazioni di manutenzione, leggere attentamente il presente manuale d’istruzione, che deve essere conservato per ogni futuro riferimento. La pistola automatica ANEST IWATA è in conformità alla normativa ATEX 2014/34/EU. Livello di protezione: categoria II 2G X adatto...
Open the catalog to page 7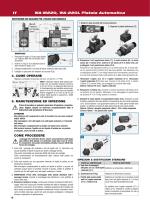
SOSTITUZIONE DEI RACCORDI PER L’UTLIZZO CON RICIRCOLO 1.Ruotare il dado ad alette (9) in senso antiorario. Filettatura per fissaggio pistola 2. Separare la pistola dalla base (12) Regolazione ventaglio Regolazione astina IMPORTANTE 1. Rimuovere il tappo (3-2) dal corpo pistola con l’utilizzo della vite (19) fornita come accessorio. 2. Inserire l’o ring (3-3) in dotazione dove é stato rimosso il tappo (3-2). 3. Collegare saldamente il raccordo all’uscita materiale della base (CIR). 4. Collegare la tubazione del materiale al raccordo (FLU). Regolare la pressione d’esercizio aria tra 4 e 5 bar...
Open the catalog to page 8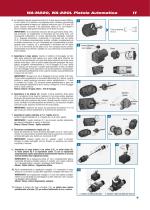
WA-M220, WA-220L Pistola Automatica 4. La regolazione del set guarnizione astina (3-4) deve sempre essere effettuata con l’astina (2-2) montata e nel seguente modo: chiudere manualmente e successivamente stringere con l’apposita chiave per circa 1/6 di giro (60 gradi). Quando rimuovete il set guarnizione astina (3-4), non lasciate il pezzo di plastica della guarnizione astina (3-4) dentro al corpo. IMPORTANTE: Un avvitamento eccessivo del set guarnizione astina (3-4), può provocare un impedimento al movimento del set astina (2-2), con conseguente trafilamento di vernice dall’estremità...
Open the catalog to page 9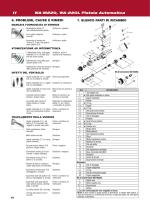
6. PROBLEMI, CAUSE E RIMEDI 7. ELENCO PARTI DI RICAMBIO MANCATA FUORIUSCITA DI VERNICE - Regolazione astina (7) Verificare e regolare. non sufficientemente aperta. - Foro ugello materiale Verificare e pulire. ostruito. - Accumulo di vernice tra Verificare e pulire. l’astina (2-2) ed il set guarni- zione astina (3-4). ATOMIZZAZIONE AD INTERMITTENZA - Trafilamento d’aria dall’ugello Verificare, pulire e materiale (2-1) e le sedi coni- sostituire se necessario. che del corpo pistola. - Trafilamento d’aria dalla guar- Stringere. nizione astina (3-4). - Trafilamento d’aria dal raccordo...
Open the catalog to page 10
Le pistolet automatique ANEST IWATA est conforme aux normes ATEX 2014/34/EU. Niveau de protection: II 2G X adapté aux zones 1 et 2. Marquage X: Toute décharge d’électricité statique provenant du pistolet doit être conduite à la terre à travers le tuyau d’air conducteur comme indiqué. Respecter TOUJOURS les avertissements pour la sécurité présents dans ce manuel d’instructions. Symbole SIGNIFICATION Bruit (LAeqT)*: Raccordement d’air Raccordement produit de la base Température Max.: * Emplacement de mesure: 1 m derrière le pistolet, 1.6 m de hauteur 1. Ne jamais utiliser les SOLVANTS...
Open the catalog to page 11All ANEST-IWATA FRANCE catalogs and technical brochures
-
 W 400
W 40024 Pages
-
 DPS series
126 Pages
-
 PET-N series
27 Pages
-
 TOF-5B/TOF-6B
16 Pages
-
 WRA-101
4 Pages
-
 ws 400/ls 400
24 Pages
-
 EXTERNAL CHARGE
6 Pages
-
 W300 WB Retouch Spray Gun
1 Pages
-
 W200 Manual Spray Gun
1 Pages
-
 LPH 80
1 Pages
-
 W400 WBX
1 Pages