- Catalogs
- Altair Engineering GmbH
- Altair HyperMesh
Altair HyperMesh

Altair HyperMesh
Create surface, volume, and graph meshes in Materialise 3-matic. Export these meshes as .fem files, which are then imported into HyperMesh for Finite Element Modeling (FEM) and Computer-Aided Engineering (CAE). After processing, export the results as .fem files and import them back into Materialise 3-matic for further design refinement.
In this example, only surface and graph meshes are created, with graph nodes connected to surface or volume meshes. Assign thickness to graphs before exporting, with options for gradient, image-based, or uniform thickness.
1. Navigate to File > Export > FEM.
2. Select the part and output directory.
3. Choose which meshes to export and apply the settings.
4. Check the .fem file if necessary, which includes lists of mesh nodes (GRID*), mesh triangles (CTRIA3), graph edges (CBEAM), and graph sections with thickness (PBEAML).
1. Go to File > Import > Solver Deck.
2. Set the file type to OptiStruct and import the file.
3. Use basic controls for inspection: Ctrl+LMB to rotate, Ctrl+RMB to move, and Ctrl+scroll to zoom.
4. Switch between solid and wireframe views, toggle tags, and change mesh color modes for detailed inspection.
After completing FEM/CAE, export the results to a .fem file:
1. File > Export > Solver Deck.
2. Set the file type to OptiStruct and use the Long format template.
3. Export the file.
Requires Materialise 3-matic 10.1 with the Remesh module:
1. File > Import Part.
2. Import the relevant meshes.
3. Confirm the import to continue design work, with shape and thickness information preserved.
Catalog excerpts
Materialise 3-matic link with Altair HyperMesh
Open the catalog to page 1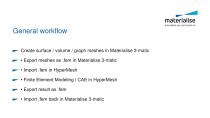
Create surface / volume / graph meshes in Materialise 3-matic • Export meshes as .fem in Materialise 3-matic • Import .fem in HyperMesh • Finite Element Modeling / CAE in HyperMesh • Export result as .fem • Import .fem back in Materialise 3-matic
Open the catalog to page 2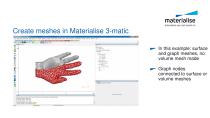
Create meshes in Materialise 3-matic In this example: surface and graph meshes, no volume mesh made Graph nodes connected to surface or volume meshes
Open the catalog to page 3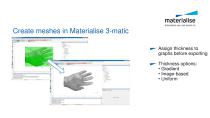
Create meshes in Materialise 3-matic Assign thickness to graphs before exporting Thickness options: • Gradient • Image-based • Uniform
Open the catalog to page 4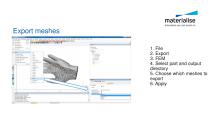
Export meshes 1. File 4. Select part and output directory 5. Choose which meshes to export
Open the catalog to page 5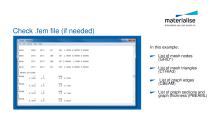
Check .fem file (if needed) In this example: ^ List of mesh nodes (GRID*) ^ List of mesh triangles (CTRIA3) List of graph edges (CBEAM) List of graph sections and graph thickness (PBEAML)
Open the catalog to page 6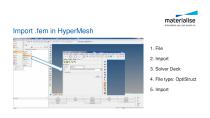
Import .fem in HyperMesh 1. File 2. Import 3. Solver Deck 4. File type: OptiStruct 5. Import
Open the catalog to page 7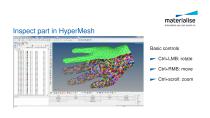
Inspect part in HyperMesh Basic controls ^ Ctrl+LMB: rotate ^ Ctrl+RMB: move ^ Ctrl+scroll: zoom
Open the catalog to page 8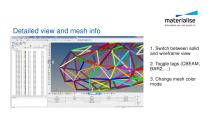
Detailed view and mesh info 1. Switch between solid and wireframe view 3. Change mesh color mode
Open the catalog to page 9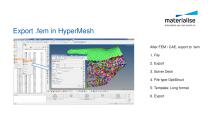
Export .fem in HyperMesh After FEM / CAE, export to .fem 1. File 2. Export 3. Solver Deck 4. File type OptiStruct 5. Template: Long format 6. Export
Open the catalog to page 10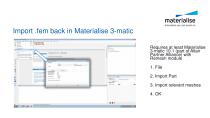
Import .fem back in Materialise 3-matic Requires at least Materialise 3-matic 10.1 (part of Altair Partner Alliance) with Remesh module 1. File 2. Import Part 3. Import relevant meshes 4. OK
Open the catalog to page 11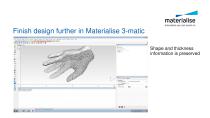
Finish design further in Materialise 3-matic Shape and thickness information is preserved
Open the catalog to page 12All Altair Engineering GmbH catalogs and technical brochures
 Altair RADIOSS
2 Pages
 Altair FEKO
2 Pages
 Altair HyperStudy
2 Pages
 PBS Professional
2 Pages