- Catalogs
- Aeros Ltd.
- MOVABLE HANG POINT
MOVABLE HANG POINT

MOVABLE HANG POINT
The movable hang point system, referred to as the trim system, is designed to allow pilots to adjust the center of gravity (CG) of a hang glider in flight. Developed by Swiss dealer Markus Eggimann, it enables movement of the hang point along the keel tube, optimizing performance in various flying conditions. The system includes a ball rail system, pulleys, wires, a rope, and a clam cleat.
Installing the Trim System on the Hangglider
The trim system is compatible with any Combat glider, allowing for adjustments within the operational CG range. Installation involves drilling a new hole in the top nose plate, removing and reattaching components like the VG pulleys and hang point tower, and installing the ball rail system on the keel tube. The process includes feeding ropes through pulleys and attaching wires to specific points, with detailed instructions provided for each step.
The Trim System Operation
In-flight operation of the trim system is straightforward, involving the use of a rope and clam cleat on the speed bar. Pulling the rope moves the hang point forward, increasing trim speed, while releasing it allows the hang point to move aft. Recommended trim speeds are 32-35 km/h in the aft position and 40-50 km/h in the forward position. Preflight inspections are crucial to ensure proper operation.
Maintenance
The trim system requires minimal maintenance, primarily focusing on cleanliness to ensure smooth operation. It is important to prevent dirt from entering the sail and to keep pulleys clean. Regular maintenance checks, as outlined in the hang glider manual, will help maintain the system's airworthiness.
Conclusion
With proper installation and maintenance, the trim system enhances the flying experience by providing a wide range of trimming possibilities. The Aeros Team emphasizes safety and enjoyment in flying.
Catalog excerpts

MOVABLE HANG POINT SYSTEM OWNER / SERVICE MANUAL Изготовлен: ООО АЕРОС Ул. Пост-Волынская, 5 Киев 03061 УКРАИНА
Open the catalog to page 1
2. Installing the Trim System on the Hangglider 4. The trim system operation DEFINITIONS Definitions used in this Manual such as WARNING, CAUTION and NOTE are employed in the following context: WARNING OPERATING PROCEDURES, TECHNIQUES, ETC. WHICH IF NOT FOLLOWED CORRECTLY, MAY RESULT IN PERSONAL INJURY OR DEATH. CAUTION OPERATING PROCEDURES, TECHNIQUES, ETC. WHICH IF NOT STRICTLY OBSERVED, MAY RESULT IN DAMAGE TO THE AIRCRAFT OR ITS INSTALLED EQUIPMENT. NOTE Operating procedures, techniques, etc. which considered essential to highlight. Please read and be sure you thoroughly understand this manual...
Open the catalog to page 3
INTRODUCTION The movable hang point system (hereinafter referred as trim system) is designed and developed by our Swiss dealer Markus Eggimann. The trim system enables to move the hang point along the keel tube, allowing the pilot to vary CG of the glider in flight from aft to forward position. The aft CG is good to maximize the climb rate when climbing in relatively weak thermals. The forward CG position enables to increase safety when climbing and gliding, specially in strong and rough conditions and increase comfort on glide by reducing the bar pressure. Positioning the CG in between aft and...
Open the catalog to page 4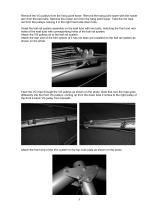
Remove the VG pulleys from the hang point tower. Remove the hang point tower with the rocker arm from the keel tube. Remove the rocker arm from the hang point tower. Take the VG rope out from the pulleys, leaving it in the right hand side down tube. Install the ball rail system assembly on the keel tube with two bolts, matching the front and rear holes of the keel tube with corresponding holes of the ball rail system. Attach the VG pulleys on to the ball rail system. Attach the rear wire of the trim system (if it has not been pre-installed) to the ball rail system as shown on the photo. Feed...
Open the catalog to page 5
Replace the hang loop with the new one, supplied with the retrofit kit. Attach the rocker arm with the new hang loop to the rocker arm channel. Reinstall the rubber bend from the right side to the left side as shown on the photos. On the left down tube replace the upper and lower brackets with the new brackets, supplied with the retrofit kit. Feed the trim system rope through the upper pulley of the left upright all the way down and through the bottom pulley in the A-frame corner as shown on the photos. Position the clam cleat on the left side of the speed bar and mark on the speed bar position...
Open the catalog to page 6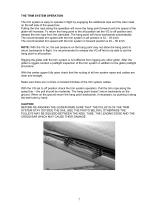
THE TRIM SYSTEM OPERATION The trim system is easy to operate in flight by engaging the additional rope and the clam cleat on the left side of the speed bar. Pulling the trim rope along the speedbar will move the hang point forward and trim speed of the glider will increase. To return the hang point to the aft position set the VG to off position and release the trim rope from the clamcleat. The hang point will move backwards automatically. The recommended trim speed with the trim system in aft position is 32 – 35 km/h. The recommended trim speed with the trim system in forward position is 40 –...
Open the catalog to page 7
MAINTENANCE The trim system doesn’t require special maintenance except taking care to keep it clean. When you set up or break down your glider, take care not to allow sand, soil and dirt to enter the sail. Keep all pulleys, especially the ball rail system thoroughly clean as moving the hang point will become difficult or impossible if they are dirty. The trim system cables must be maintained in good condition. The trim system is a part of a hang glider. See in the hang glider Manual the chapter “Maintenance” for more detailed maintenance description. With proper care and maintenance, your trim...
Open the catalog to page 8All Aeros Ltd. catalogs and technical brochures
 ANT-E DRIVE
3 Pages
 Hangglider PHANTOM
20 Pages
- Parachute
- Single place free flight harness
- Paragliding free flight harness
- Reserve parachute
- Single place parachute
- Windsock
- Airport windsock
- Windsock with mast
- KENNAMETAL ultralight trike
- KENNAMETAL piston engine ultralight trike
- KENNAMETAL two-seater ultralight trike
- KENNAMETAL ultralight trike wing
- Two place UL trike wing
- Hang-glider
- Sport hang-glider
- Single place hang-glider
- Performance ultralight trike wing
- Motor glider
- Performance hang-glider