グループ: SIGNALIGHT ELECTROMAX SRL

カタログの抜粋

+40 254 515 465 office@signalight.com 36 Lunca Street, Petrosani, Romania www.signalight.com
カタログの1ページ目を開く
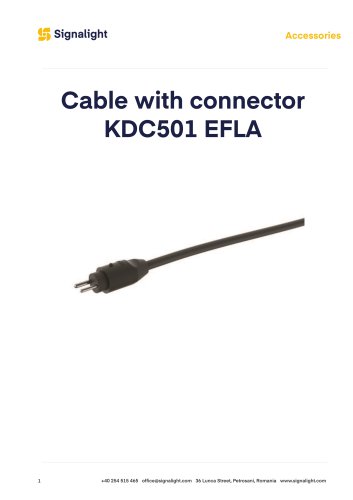
AL - 115 - AXX Series Indicator (Airfield Lighting) Product Code Product Indicator Description of product type (Accessory) Accuracy Batteries Battery life Housing material Operating temperature range 10 °C to +5o °C / 14 °F to 122 °F Storage temperature range -20 °C to +65 °C / -4 °F to 149 °F Degree of protection IP65 IInserting batteries/ battery replacement Unscrew battery compartment lid, insert new batteries into battery compartment according to symbol. Suitable rechargeable batteries can also be used. LCD indicator: Battery low – insert new batteries Dispose of used batteries at...
カタログの2ページ目を開く
1 - TECH 500 DP (dust-proof and waterproof in accordance with IP 65) 2 - Battery compartment lid 3 - Display 4 - T-groove profile for securing with M4 groove stones, e.g. Bosch Rexroth® or square nut in accordance with DIN 557 5 - V-shape for aligning on round surfaces 6 - Rare-earth magnet 7 - Buttons ON/OFF 8 - Units of measurement: °, %, mm/m, in/ft 9 - Calibration and sensor adjustment 10 - HOLD – locking measurements 11 - Reference – freely selectable zero position 12 - Acoustic guidance 13 - Key lock 14 - Display lighting
カタログの3ページ目を開く
Display elements 15 - Elements for visual guidance 16 - Acoustic guidance: activated 17 - See chapter 5.1 18 - Units of measurement: °, %, mm/m, in/ft 19 - See chapter 7.4 20 - Reference: activated 21 - See chapter 7.4 22 - Key lock: activated After switching on with the "ON/OFF" button, an automatic test is carried out. All the display's segments are shown. After the end of the test, the version number S x.xx of the software is briefly displayed and the automatic switch-off time (Auto OFF) is shown. An acoustic signal indicates that the unit is ready for operation. The display shows the...
カタログの4ページ目を開く
Visual guidance In the range of ± 15° to the horizontal (0°) or to the vertical (90°), arrows show which way to turn the digital protractor to reach 0° or 90°. The 2 "centre display" bars indicate the precise position at which 0° or 90° is reached. Acoustic guidance The acoustic guidance is activated/deactivated using the "Loudspeaker" button. The tone sequence speeds up as the 0° or 90° position is approached in a range of ± 2°. A change in the pitch indicates that these positions have been exceeded. A continuous tone confirms the precise point at which 0° or 90° is reached.
カタログの5ページ目を開く
Automatic display inversion The display is inverted for overhead measurements so that they are always easy to read. Setting the MODE unit of measurement The unit of measurement is set by pressing the "MODE" button several times. in/ft decimal: Display in 0.01 in/ft steps in/ft fraction: The set unit of measurement is retained after the unit is switched off.
カタログの6ページ目を開く
Locking the measurement with HOLD The current measurement can be locked by pressing the "HOLD" button. The visual guidance indicator flashes. The measurement is displayed continuously. The locked measurement is deleted by pressing the "HOLD" button again or switching the unit off. The "REF" button can be used to select any set angle as 0° reference. The angle details now displayed relate to this reference angle. The displayed value flashes with this setting. A: The reference angle value is displayed for 2 seconds by briefly pressing the "REF" button. Freely selectable zero position REF B:...
カタログの7ページ目を開く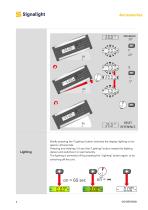
Briefly pressing the "Lighting" button switches the display lighting on for approx. 60 seconds. Pressing and holding (≥ 5 sec) the "Lighting" button makes the lighting darker and switches it on permanently. The lighting is switched off by pressing the "Lighting" button again, or by switching off the unit.
カタログの8ページ目を開く
Function: Key lock to prevent inadvertent activation. Display after activation: key symbol. The lock is activated for the following buttons: "MODE, CAL, HOLD, REF". The key lock remains active after switching the unit off and back on again! Pressing and holding (≥ 3 sec) the "Key" button disables the key lock. Pressing the "Lighting" and "Acoustic guidance" buttons at the same time allows the automatic switch-off time to be changed from 1/8 of an hour (approx. 7.5 minutes) to 2 hours. The set switch-off time is retained after the unit is switched off and is displayed briefly when it is...
カタログの9ページ目を開く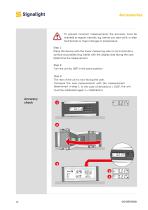
To prevent incorrect measurements, the accuracy must be checked at regular intervals, e.g. before you start work, or after hard knocks or major changes in temperature. Step 1: Place the device with the lower measuring sole on as horizontal a surface as possible (e.g. table) with the display side facing the user. Determine the measurement. Step 2: Turn the unit by 180° in the same position. Step 3: The rear of the unit is now facing the user. Compare the new measurement with the measurement determined in step 1. In the case of deviations > 0.05°, the unit must be calibrated again (->...
カタログの10ページ目を開く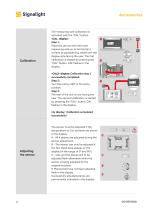
The measuring sole calibration is activated with the "CAL" button. -CAL- display: Step 1: Place the device with the lower measuring sole on as horizontal a surface as possible (e.g. table) with the display side facing the user. The first calibration is started by pressing the "CAL" button. CAL flashes in the display. -CAL2- display: Calibration step 1 successfully completed. Step 2: Turn the unit by 180° in the same position. Step 3: The rear of the unit is now facing the user. The second calibration is started by pressing the "CAL" button. CAL flashes in the display. rdy display:...
カタログの11ページ目を開く
Step 1: Simultaneously press the "MODE" and "CAL" buttons. Step 2: Hold the unit in plane 1. Press the "CAL" button. If the plane has been adjusted successfully, it is permanently indicated in the display. Step 3: Turn the unit by 90°to plane 2. Press the "CAL" button. If the plane has been adjusted successfully, it is permanently indicated in the display. Step 4: Turn the unit by 90°to plane 3. Press the "CAL" button. If the plane has been adjusted successfully, it is permanently indicated in the display. Step 5: Turn the unit by 90°to plane 4. Press the "CAL" button. If the last plane has...
カタログの12ページ目を開くSignalightのすべてのカタログと技術パンフレット
-
 Runway Guard Light
6 ページ
-
 Low Profile
3 ページ
-
 Frangible Bracket
3 ページ
-
 GPI
GPI7 ページ
-
 POLARIS WEB CONTROL
17 ページ
-
 FLOODLIGHT 20W
8 ページ
-
 FLOODLIGHT 60 W
8 ページ
-
 Flat-ALIGNMENT-FD
8 ページ
-
 Coupling Tube
3 ページ
-
 Base Plate
3 ページ
-
 Surface Mounted Base
3 ページ
-
 Mounting Flange
3 ページ
-
 Frangible-Coupling
3 ページ
-
 Vista-Threshold-End-
9 ページ
-
 SOLAR POWER SYSTEM
7 ページ
-
 PULSAR
9 ページ
-
 BEACON
8 ページ
-
 WAGGY
WAGGY6 ページ
-
 Vista Taxiway
9 ページ
-
 Console Controller
5 ページ
-
 Guidance Sign
7 ページ
-
 AL 104-04-GR/RE
9 ページ