
カタログの抜粋

VERSION - 04/16 © Copyright by FLY Products s.r.l. Via Peru n. 30 63013 GROTTAMMARE (AP) - ITALY tel./fax +39.735.632486 www.flyproducts.com - * fly@flyproducts.com
カタログの1ページ目を開く
XENIT THOR 250 USER’S MANUAL VER. 1.1 Index XENIT THOR 250 DIMENSIONS TRIKE PARTS ASSEMBLING THE FRAME MOUNTING THE PROPELLER SETTING UP THE TRIKE FOR MONO OR TANDEM FLIGHT EMERGENCY PARACHUTE The XENIT THOR 250 Trike is for all those pilots who want to fly alone or with a passenger in a light but solid vehicle which is also cost-efficient, low-maintenance and easy to transport. The cage is made in powder-coated aluminum and the carriage bar, the harnesses attach to, in stainless steel 304. This guarantees safety, flexibility and support for the pilot and the passenger. The choice of...
カタログの2ページ目を開く
XENIT THOR 250 USER’S MANUAL
カタログの3ページ目を開く
XENIT THOR 250 USER’S MANUAL Section 3. TRIKE PARTS
カタログの4ページ目を開く
XENIT THOR 250 USER’S MANUAL Section 4. ASSEMBLING THE FRAME For easy and correct assembly work through the following steps: Lift the back end of the carriage Place the back end of the carriage on a box or any kind of support of about 25 cm high
カタログの5ページ目を開く
XENIT THOR 250 USER’S MANUAL Turn the support bar until it is possible to insert the front bolt, tighten both bolts taking care not to crush the bar. Screw the back bolt in place without tightening it Position the cradle properly and insert the cradle bolts.
カタログの6ページ目を開く
XENIT THOR 250 USER’S MANUAL Using the nuts, secure the upper and lower bolts. Using the Velcro strips, secure the harness to the lower bar of the carriage. Fit the front belt of the pilot harness.
カタログの7ページ目を開く
XENIT THOR 250 USER’S MANUAL Secure belt passenger harness Adjustable belt Pilot harness belt
カタログの8ページ目を開く
XENIT THOR 250 USER’S MANUAL Attach the right cable (the one without the tensioning device). Insert the push pin from the back into position Attach the left cable and using the tensioning device pull the cable tight. Insert the 2 lower parts of frame.
カタログの9ページ目を開く
XENIT THOR 250 USER’S MANUAL Insert the 2 push pins into position and secure the cage. Insert the upper support and using the push pin secure it in position.
カタログの10ページ目を開く
XENIT THOR 250 USER’S MANUAL Assemble the 2 upper parts of the frame and fit them firmly in place using the 6 velcro straps. Attach the 2 elastic cords near to the wheels.
カタログの11ページ目を開く
XENIT THOR 250 USER’S MANUAL Fit the tank into its placement. Connect the fuel tubes. Secure the tank in its placement using the tank belt.
カタログの12ページ目を開く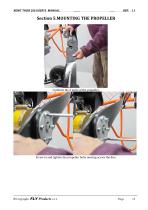
XENIT THOR 250 USER’S MANUAL Combine the 2 parts of the propeller. Screw in and tighten the propeller bolts moving across the disc.
カタログの13ページ目を開く
XENIT THOR 250 USER’S MANUAL
カタログの14ページ目を開く
XENIT THOR 250 USER’S MANUAL Section 6. SETTING UP THE TRIKE FOR TANDEM OR MONO FLIGHT Tandem setup The glider attachment must be positioned The glider attachment must be positioned further further back for flights with a pilot of over forward for flights with a pilot of less than 85 kg 90 kg and passenger of less than 85 kg. and passenger of over 90 kg. Mono setup Position the glider attachment as far back as possible and use position 2 for a pilot of over 90Kg. Position the glider attachment as far back as possible and use position 1 for a pilot of less than 85Kg.
カタログの15ページ目を開く
XENIT THOR 250 USER’S MANUAL Section 7.EMERGENCY PARACHUTE A reserve parachute can be attached to the XENIT THOR 250 and is highly recommended for obvious security reasons. The reserve parachute is located under the harness of the pilot. Assembly procedure of the emergency system: Insert the rescue pack in the pocket, then using a piece of string pull the loop through the hole and close the pocket with the hook
カタログの16ページ目を開く
XENIT THOR 250 USER’S MANUAL Attach the third hook. Attach the 2 parachute straps to the 2 carabiners, protect them with the 2 covers. Pass the 2 parachute straps through the strap holder Side view of the mounted rescue pack and harness.
カタログの17ページ目を開く
XENIT THOR 250 USER’S MANUAL Section 8. A ASSIST SYSTEM Attach the belt to riser A of the glider The belt must not be in tension when the riser A is in vertical position. Section 9. START AND STOPPING ENGINE This trike can be equipped with a manual accelerator Manual accelerator
カタログの18ページ目を開く
XENIT THOR 250 USER’S MANUAL On startup (when the engine is cold) pull up the choke (1)Master switch (2) Starter button (3) (RPM gauge-Running time of the engine and water temperature (4) Stop switch
カタログの19ページ目を開く
XENIT THOR 250 USER’S MANUAL Manual startup (the Polini Thor 250 engine is also equipped with a manual start) Section 10. SPECIFICATIONS Engine type Tank capacity Thrust at sea level Propeller Trike weight when empty Max weight transportable (pilot and passenger) Tyre pressure
カタログの20ページ目を開く
XENIT THOR 250 USER’S MANUAL Warranty Fly Products (Seller, Our, Us) warrants the original Purchaser that this product shall be free from defects in materials and workmanship under normal use for a period of 12 months from the date of purchase. If for any reason this product is powered by fuel that does not meet the criteria stated in the engine manual, or is used with other equipment, parts or replaceable items (such as consumables) which are neither made nor approved by Fly products, Fly Products shall not be responsible for any loss of quality, degradation of performance or actual damage...
カタログの21ページ目を開くFLY PRODUCTSのすべてのカタログと技術パンフレット
-
 Flash Cruiser
23 ページ
-
 VERTIGO
13 ページ
-
 ECO 2 LIGHT
24 ページ
-
 LUNA
LUNA4 ページ